Tuesday 25 February 2020

Longstreet 8 - Battle of Petersen’s Cornfield

Game 8 of the grand campaign, last of 1864, and the scenario was ‘the Cornfield’, with the Yankee’s on the attack. It’s a tricky scenario with so much LoS blocked by cornfields, you have to get up close. My plan of attack was a double envelopment, to be strong on both flanks with a screen of troops, and 1 artillery battery in the centre. I was expecting my strong showing on the left and right would draw his best units to meet my advance, and then, with my superior cavalry uncommitted, I could unleash it in a lightning dash up his weakened centre to grab the objective. If either flank was making good progress then the cavalry could then move to support it instead and drive it over the objective. I would go for it today, all out attack, no point in hanging around, my superior guns couldn’t see the enemy for a bombardment, so I’d haul them forwards for close support canister work instead. All started on limbers.

That’s the plan, and as ever it really did not work like that. The Rebs surprised me by going aggressive themselves and attacking, in force, right up the centre! Oh, my cavalry would be in the thick of it from the off, forced into the fight too soon as my flanks still marched up to assault range. Still, my cavalry did a fine job, dismounting and halting his Alabamans with carbine fire, then both his guns and mine unlimbered and started targeting each other with canister - we’ve never had guns so close to each other before. My reliable old Ohio boys moved into the overgrown briar thicket, but were soon under heavy fire and taking losses. The two main strike regiments, both my large units of fresh, eager, recruits of the 85th and 101st US Colour Regiments were moving up in column then formed into line ready to press home. In general, incoming fire against them was ineffective and they looked like a sledgehammer compared to the Rebel’s thin lines. But, the veteran Rebs had had the best of the opening exchanges.

No time to waste with the centre under pressure, go, go, go, my boys fixed bayonets and set too in an almighty charge into the Petersen cornfield, now a redoubt of Rebs defending on 3 sides. In went the coloured regiments and both won their melees, driving the Rebs back and destroying the Alabamans in detail, scattering them through the corn fleeing. But the smaller support charges fared badly. My New York Irish were repulsed by his dismounted cavalry and took heavy losses in doing so. I charged with the still mounted cavalry unit, headlong, only to be badly repulsed (cavalry head to head with formed infantry isn’t a good idea, especially when he has a stone wall card and a fire and brimstone preacher to aid them. My bold cavalry were shot down to a man, 6 stands all lost! Massacred.

The losses had been high on both sides in those melees, but higher for me. Now, with just 2 cards in hand, the Rebs unleashed a volley of musketry with ‘Withering Volley’ to aid it. The musket hits mounted, helped by the re-rolling misses, and carnage ensued as from 11 hits, he scored 8 casualties, blue-coats were falling left, right and centre around the field’s perimeter. The Ohio boys were wiped out to a man (having been with me since game 1, a sad loss)… and those punishing losses pushed the Union over its break point. Defeat, in a very quick game (1 hr, 15 mins). The Rebs had held their cornfield redoubt and inflicted over 2-1 losses on my boys in the process. 28 stands lost to just 11 inflicted.

Back to the drawing board for that plan. But again, huge fun, especially the blue-wave grand charge that looked like it might overwhelm the Rebs, but they hung on. Their next volley was crushing.

So, victory to the Rebs, breaking the run of defeats and making the campaign very close on results, with just 1 game to play for 1865. Still, I lead on Epic points… so an overall blue win looks likely, but we’d like to end with a win on the field.

Just a few shots, just didn’t have time for many, it was too short and bloody…

Rebs push forwards in the centre, hauling up a gun battery as well. My thin line of cavalry and a support battery of my own to hold them as the flanks advance.

 The Union left, advancing through the cornfield to swing around right and attack the main Reb positions in the central cornfield (centre top here). 

 The centre, cavalry, about to dismount and guns coming forward. Rebs pressing forward quickly.

22nd Ohio take up position in the thicket, their final resting place. The right flanking assault troops are marching by in the foreground. 

Reserve cavalry in column, to move-up, form line and attack up the centre if it looked weak enough (it didn't) or move to support another attack. It did on the right, and made an ill-fated charge, through the thicket, that turned into a massacre. 

 Petersen's field how thick with grey's.  My dismounted cavalry have pulled back, clearing the route for the 85th... now in attack column, about to charge and keen for some vengeance.

and in they go... crushing the Alabaman regiment in the process, a notable win on an otherwise bleak day for the Union.

The brigade roster for the finale...  after 8 campaign turns.

Sunday 16 February 2020

Erfundensdorf FotR Campaign - Battlefield 5 - ErfundensseeStraBe and Birkenhof Farm

Finally found a wet Sunday afternoon to get the FotR campaign moving again. This battle was a 750 point Meeting Engagement, the only battle of Campaign Turn 2, as Taskforce Edgar, the victors in Battle 4, pushed on north of town to cut the road out of town and have it all but surrounded. Incoming, trying to get into town was Stossgruppe Schultz, an armoured column of inexperienced Panthers and armoured recce troops. The heavy-hitters of the German scratch forces in the campaign.


 The campaign map, so far US task forces have captured tables 1,2,3 and 4 (earlier games) for entry points onto table 6 in the final game. This game was for the full set, and all but surround the town in a final 'Kessel'.


The German’s task was two fold, halt the US advance to secure the road from town, and get troops into town to reinforce its defences. There was also another sub-plot. This board was the position of the ‘off-table’ Nebelwerfer battery used in earlier games, and it would need rescuing, with the US armoured spearhead bearing down on them. The two werfers would need their RSO tows to get to them, from the farm, and drag them off the table in the direction of town. The werfers were not allowed to fire at this table, too close, and they had to be saved.

For the first time the Germans had some serious armour, 4 Panthers, a Jagdpanther and a Brummbar. Coming the other way, 6 US Shermans (mostly 76s), 2 Pershings, 2 Jacksons and dedicated off-table Priest artillery fire.

Anything that survived the battle for the Germans would be available in game 6, the finale of the campaign. If the US could take the tabletop, they would have another entry point for the final battle as well, with Task Force Edgar in place north-east of town, cutting the road and able to us it to attack into town as well.

It would become a tank brawl, with the armoured infantry playing little part. The US held theirs back, out of harms way (mostly). Of the German armoured recce troops, half quickly escaped into town, the others put up a short defence of the farm, then pulled out, losing some vehicles but no men.

The US advanced through the woods and the game got under way, with 4 turns of failed radio checks for US artillery support (those Priests must be busy elsewhere). The early tank dual at range resulted in no losses, a few pins, but nothing but wasted ammo, although HE became the shell of choice to try for some pinning, saving the AP shells for better shots later.

The two RSO tows made a bee-line for the Nebelwerfer battery, through incoming HE shells, and one was KO’d by a HE hit from a Jackson - only 1 Werfer could be saved, but it was, towed off into town a few turns later. The Panthers moved in, and immediately the Jagdpanther attracted the ‘cursed of the chit-magnet’, with an ‘Out of Fuel’ counter played on it that saw it run dry and the crew abandon it without a shot fired! Rubbish, the big-hitters never do the business for me. I lost a Panther to a Pershing’s first shot, an unpleasantly even fight for once for the Panzerwaffe. US artillery finally dialled-in and the road became a dangerous place with 105s constantly landing all around it. I lost my 250/11 half track running that gauntlet.

The fight at the farm saw the US boldly push up the forest track, 2 Shermans leading, 2 halftracks behind to storm it, but my infantry had got their first. The Shermans then found 2 Panthers coming the other way and quickly lost that fight, both KO’d in a one-side close-range duel. The M3 half tracks, on the track behind the burning Shermans, saw they were next in the Panther’s sights, turned tail and sped off back into the woods to hide. It didn’t matter though, the Panthers were low on ammo, and used it up dueling with the Shermans and Pershing, to little effect. Ammo bins bare, they pulled back off the table, into town to re-arm for the final fight. My last infantry also remounted and skidaddled as the US armour closed in, KO-ing my 250/9 recce half track and a last Panther as they tried to get away… not a good final turn!

In the end, it was obviously a US win, although neither side had broken. The US had lost 2 Shermans and 1 Pershing had broken down (it’ll be fixed for the final battle). German losses were 2 Panthers, the Jagdpanther, 3 half tracks, 1 Nebelwerfer and a RSO. So Stossgruppe Schultz had been shot-up getting into town. Taskforce Edgar’s tanks had cleared the way to the farm and were astride the road into town from the northeast. Erfundensdorf is now surrounded.

The final battle of the campaign will be the assault on the town, a version of the ‘Die Hexenkessel’ scenario, with multiple entry points for the US forces and the Germans in an all-round defence. Time to sit down and work-out who has what forces left for that fight. Winner takes all in game 6.

The field of battle, US from the woods on the left, Germans arriving from the right and around the farm. 

 RSO set-off from the farm to collect the Werfers. 

Awaiting tows, out in the fields. Rescuing the launchers would help in the final battle. 

US end of the table, woods, into the open fields.

Off they trundle. 

Behind them, a StuG arrives from town to hold the farm. It traded shots, pinned a Sherman, ran out of ammo and withdrew, a brief cameo whilst the other German units arrived. 

 Here they come, up the road, first units of Stossgruppe Schultz arrive, heading into town. 

First of the big cats, with a long field of fire.  

First US armour at the wood's edge. 

 
Sherman pinned by a glancing AP shell from the StuG.  

A few shots kept the US back, then, without any ammo resupply (for either side), ammo was big factor. Out, it's time to go.  


 Infantry reach the farm and dismount.

 RSO under HE fire, getting closer as they dodge the incoming.

 
Oops, failed... RSO blown up by accurate 90mm HE.

 
Next arrivals.

 Jagdpanther... rolls up.

 Noooo! Out of fuel, the crew do a runner... brill! 

StuG retreating, 2 Shermans push up along the forest track to the farm - very bold! 

 Coming the other way...

 A timed 81mm mortar strike on the woods, pinned Jackson, that's it. Drat. German artillery is, well, limited!

 RSO heading for town with its launcher. One would have to be abandoned.

 The tank fight for the farm about to begin.

 US armoured infantry hanging back in the safety of the woods, as the tanks get too it up front.

 A Pershing struggles through the woods and conks out! Still, it was in a pretty good firing position and continued to provide supporting fire, killing 1 Panther as it tried to escape. 

 Running the gauntlet up the road of impacting 105 shells. Much pinning, 250/11 blown up.

 Close encounter at the farm, bold Shermans vanquished.

 The German light armour burning though.

 At the very end, the M3 half tracks finally come forwards across the fields to secure what the tanks have won.

German wrecks litter the surrounding fields, the break-in to town had been costly, and how badly that affects the final game is yet to be seen. The Germans will misses those 2 Panthers (not to mention the galling loss of the Jagdpanther!).

Tuesday 11 February 2020

Longstreet, Grand Campaign, Game 7


Just a quickly, game 7 was another close fought affair, a meeting engagement from the march, with us both advancing our forces onto the tabletop via opposite corners. The Rebs were the 'attackers', so went first and decided to be very aggressive and push rapidly forwards, at the double. I had to respond or be pinned into my corner. I used my cavalry to fly left and right in column before dismounting and forming a firing lines to give me some space, otherwise the Rebs at the quickstep would deny me any room to manouevre and get well deployed. My cavalry's fast flanking movement stretched out the battlefield for me and allowed me to get some artillery deployed in better positions, to begin the on-going, never-ending, counter-battery duel with his guns. It's become their own private war. He targets me, so I target him! (He started it!).

The right flank was a fight between my dismounted veteran Maine cavalry and 3 guns, vs his veteran Virginian infantry and 2 guns, and resulted in stalemate, which I was gradual getting the upper hand in... but not by much. Still, right flank secure, good enough.

The left was a skirmish fight in a large wood, between my again dismounted cavalry and 1 unit of his veteran infantry, but my cavalry made good use of my commander's 'Scout' ability to out skirmish the Rebs and gradually edge the upper hand in the attrition. Left flank secure, risky using 'Scout' a lot, but why have it and not use it? Interesting and very different battle this.

So the crucible of this fight was in the centre, across a large cornfield and another large wood, where his infantry deployed from column into line as mine trampled through the dense trees and undergrowth. He had two good units, 12 stands, I had 3 small units,  but 12 stands as well, including the now legendary 22nd Ohio-boys, fighting this war since 1861. I had 1 artillery battery of 3 guns in support, but so did he. It was even, until his cavalry reserves raced up behind to help out, and it looked like they might swing the fight his way. Lots of skirmish fire through the trees and corn (it was the game of skirmish firing), and my front recruits regiment was charged, beaten, and pushed back through the woods, but with only 1 stand lost. I lost 2 of my guns of the battery to his counter-battery fire, but got 1 of his in return, it was a 'damn close run thing'. He was edging it.

In the end, after a turn snarled in the dense woods by a useful 'Trackless' special card from me, that slowed him down and stopped him shooting, he committed to a grand charge instead. In through the trees came his 2 regiments, bayonets fixed, and his cavalry too, but I had hung-on to a 'Like a Stonewall' card, and also had my Preacher to support the defence of the woods. In was swirling messy brawl, but my Ohio veterans, aided by their Hero as well, saw-off his cavalry - woo-hoo! Old Reliables indeed. My New York Irish recruits then saw off his Alabamans and the few losses he incurred, but not many, meant I had a 6 chance of victory against his Shatter Point. I rolled a 6... lucky! Game Over.

The Rebs broke, his forces withdrawing. 1 more stand of casualties to me (I'd lost 13, him 14) and he would have been rolling to break me... so it was very close and, tbh, just unlucky on the Rebs. One of those games where you do nothing wrong, just in 1 turn the cards helped me (Trackless, Stonewall) and he got no cards to aid his grand charge (Cold Steel or Rebel Yell would have been handy and swung the game I think). Fun, fun, fun... another Yankee win, if not a very glorious one, an ugly brawl in the trees today... but I still have the lead in the campaign.

No pictures I'm afraid, as I forgot my camera and my phone was dead... instead, my brigade roster as it stands moving into later 1964. 2 games to go in this grand campaign... and I still have my nose in the lead. 4 straight wins in Longstreet, an unheard of run. My luck can't hold much longer.  Game 8 is next week, half-term... so time off to play.


Thursday 6 February 2020

Nam ’68 First Play-Test

Please be aware this is very early days, and the game is rough, very much a WIP, with lots to do and lots will change, but, the best way to workout if things are working and if the game is fun, is get some models on the tabletop and get moving them about.

The first part of the game is to generate the Scenario, and there are various elements to this. This would all be done before the game, to save time, and be ready for game-time. Creating the scenario is broken down in various steps.

1. Threat-level. This game will be a low (Lima) threat level, the lowest, so not expecting too much VC activity today and the area is considered reasonably secure and pacified. Obviously, there will be some resistance, otherwise there is no game, but it shouldn’t be too severe, mostly a few local VC.

2. Game size. 1 Squad. The smallest, so 1 squad of my platoon will be involved. I randomly generated which one from my platoon roster, and its 3rd Squad, under Sergeant Redecker.

3. The Mission. A random roll got me a Security Patrol, and fairly routine mission, just checking out the area for VC activity and keeping a high profile to discourage any. No doubt we are still fairly close to the platoon’s base. So, ‘send a squad, take a look around, report back anything suspicious’.

4. Location. Where this is taking place. A random roll (you could pick) and this is along a highway or road location. My patrol is moving up that road.

5. Civilians. Are any civilians present? In a low threat area, along a road, yes. 2D6 of them in fact. So I roll, and get 8. 8 non-comms are currently in the area or using the road.

6. Search Points. The mission contains a single search point for the US patrol to investigate. More later, but in effect, its some thing for the US troops to take a look at. On the highway, it might be cart or vehicle, but it could be anything.

7. Sub-plots. Optional this, but as a test, best include one. A random other sub-plot that might effect the fighting. I roll, its a Tropical Downpour. It is raining, a lot. So my guys  reduce their Morale a bit (-2) for being out in the rain, and the ground is muddy for any vehicles (of which there aren’t any in this game, but if my squad were armoured infantry, they could have an M113, but its unlikely to be used in a low threat scenario, armour comes in as the threat gets higher).

8. VC Forces. In this low threat area what VC forces are actual lurking? I generate them and get.

1 VC sniper
1 VC Infiltrator (starts hidden as a civilian model)

A hidden VC command bunker, containing 3 men, all with AK-47s. One is a Cadre (commander), one is his radio operator, the other their guard/ runner.

3 VC riflemen with bolt action rifles (1 has a rifle grenade), these are the extra guards for that bunker.

In all, that's a Break Rating of 25.


VC lurking, with 'old man farmer' infiltrator, not that the US knew this. Sniper, 3-man bolt-action rifle team, 3-man command team with AK-47s.


US Forces
My platoon’s 3rd Squad has 2 fire teams. Fire team 5 (of the platoon) is 4 men. The Squad Sergeant, the fire team’s own corporal, a grenadier with his M79 ‘blooper’ and one rifleman. These guys are Veterans, and have seen some action before. They are Sergeant Redecker, Corporal Brown and Privates Cummings and Madden.


 Sergeant Redecker, Corporal Brown, Privates Cummings and Madden

Fire team 6 is 5 men. The fire team’s leader, a Corporal, their grenadier, 2 riflemen with M16s and a rifleman with a shotgun. These are all Recruits, new guys. They are Corporal Santiago and Privates Hobbs, Myers, Swados and Orlando.


Santiago, Swados, Hobbs, Myers and Orlando on the shotgun.

They might have some platoon support, from their weapons teams or platoon HQ, but as a 1 squad game in low threat area, the platoon support team options are 0. For Fire Support Requests, again, as the smallest and lowest threat level game, there are none. No mortars, arty, helicopter gunships, extra reinforcements, etc. will be aiding them. So, its just these 9 guys, foot-slogging it out in the rain. In all, that is a Break Rating of 22, but minus 2 for the rain, so actually 20.


That is it, we’re ready for our small skirmish, as 3rd Squad, 1st Platoon, Bravo Company, 1st Battalion, 12th Infantry, make their wet-ass patrol along this muddy road, and run square into 8 local VC guerrillas defending their hidden bunker and a Cadre.

Contact!

As a WIP, and the first time at that, this was very slow and a lot of time was taken checking and changing things that didn’t work, or didn’t feel right, or were, basically, just wrong. I had no idea how to deploy, what to deploy, or where, or how all that would work for this scenario. In the end I plumped for 1 fire team on point, up 15” onto the table, but more than 5”, and 1 fire team is support, up to 5” onto the table. The VC, well they would pop-up, and given no special deployment rules (like hidden tunnels), they be within 20” of their table edge.

Once set-up, turn 1… and things got going. The point man, Private Madden of 5th fire team, headed up the road to investigate the one Search Point, roughly central to the table. The waiting VC sniper took aim, took his shot, missed, and we had contact!

The 3 VC bolt action rifle men emerged from hiding to open fire, with no major effect but pinning Madden in the road as he hit the deck, joys of being point-man. US return fire, M16s blazing, caused zippo too, as the VC good cover of the wall proved itself valuable. The only down side for them, a suppressing HE 40mm grenade scored a lucky hit and wounded the sniper… he was down and bleeding. Some of the civilians moved (how this will work is very up-for-grabs), most heading up the road, whilst the old man left his water buffalo to wallow and moved across the field, I’m sure he had urgent ‘agriculture-stuff’ to do! The US player had no idea if there were any infiltrators and if so, which civilian any might be.

The fire fight built up, prone in the road, Madden was hit and wounded, bleeding but not badly, but Sergeant Redecker crawled through the paddy field to try to get to him, and got pinned himself by incoming rifle fire. The Sergeant had is head well down, but his grenadier behind kept up those 40mm blooper grenades in support, which failed to pin much except all the women at the tea-house. Pinned civilians do zippo and are hard to unpin. So they were just screaming on the floor!

Corporal Santiago tried to get to the good cover of the stone wall, running across a paddy field bund, only to get winged by a rifle round. He was down, but only a flesh wound.  On the left, Private Orlando with the shotgun, paused to check the one civilian by the house wasn’t a VC, then moved up round the house, whilst Private Swados covered him. Two VC appeared ahead in the tree line, the bolt action rifleman doing little, but an AK-47 then opened up and sent Swados diving for cover in the bushes. Orlando, in reply, slung his Ithica, and flipped a M26 grenade into the trees. Boom! Good shot, the AK was silenced as the VC was down, badly fragged in the blast. The other guy was pinned, dazed, but OK. Orlando then got to blasting the tree line with 12 gauge buckshot to keep his head down. In the end, out shot by a M16 and booming shotgun, the VC crawled off, deeper into the woods, to ‘regroup’, leaving his bleeding comrade behind.

Meanwhile, up the road, Madden had recovered and was back in the fight, he finally reached the search point and checked it out. It was a supply cache… awesome… more morale lost for the VC. But then, completing the search, he was hit again by rifle fire and down, badly wounded this time, he needed help if anybody could pin that damned rifleman to help the others get to him, but they couldn’t, the wall was too good cover (that VC passed 5 of 5 cover saves, and kept shooting, one tough bastard).

On the far left, Corporal Brown, bypassing the old man civilian in the field, sprinted then cautiously advanced under no incoming fire to try and find that downed sniper. The sniper was under a bush and he just couldn’t see him, repeatedly failing to spot, even at 2”. Seriously wounded, the sniper, if spotted, was a dead man - 5.56mm, 2 to the chest, 1 to head…

That old man turned out to be the infiltrator, emerging from the undergrowth, he found grenadier Cummings, blooping away, and lobbed a hand grenade his way. Cummings dived for cover but was pinned by the blast, ears ringing and smoking slightly, but OK. The old man, now declared as a VC fighter, turned and ran off, and sprinted for the board edge (no other weapon, just 1 grenade), dodging M16 fire that couldn’t pin him, until another 40mm grenade went off and blew him of his old feet… he was pinned now.

Unpinning had cost the VC side heavily in morale, and the 40mm grenade barrage had done its HE job. HE is good at pinning. With two men down, the VC decided enough for today and ran-off. Mobbing up, 3rd Squad would find themselves with 1 VC corpse, the sniper bled-out. One seriously wounded POW… who might actual be just another corpse in the AAR, to increase the body count. They also had a supply cache found and a command bunker that would need some tunnel rats to investigate further. In return, Private Madden was wounded, with a 3-month lay-off in the hospital with multiple gunshot wounds. Corporal Santiago was OK though, a flesh wound that wouldn’t see him miss any action, but would get him a purple heart. (Is it true that 3 purple hearts meant you got a ticket home?).

Game over… first test complete and, well, it worked, mostly. Many things didn’t… might have to look carefully at HE’s effectiveness - at the moment it is very and the 40mm bloopers dished out a lot of pinning which ultimately broke the VC. The ammo rules worked well, although the US rolled well and didn’t run ammo low with anybody, one VC rifleman did… the guy that did most of the shooting, and missed with his rifle grenade! Much to do, but a good start.

In all, 3-4 hours work, too long for this size of game, but there was a lot of fannying about, talking, discussions of options… I’ll get it down to 2 hours or less.

Shot of the actions…

Roadside tea-shop ladies. 3 of 8 civilians in the game. 

The search point, just a point on the tabletop. Here marked with a spare civilian porter, but it could be anything really, a pile of sacks or crates, or just a bush. 


 On Point. Private Madden heads up the road to check it out, and gets the first incoming rifle fire. Duck!

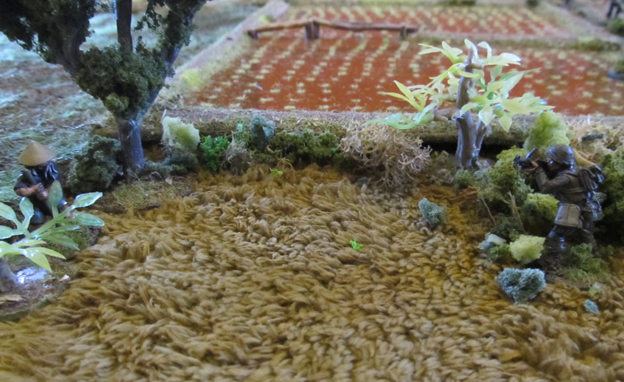
 Over in the fields, the old farmer and 'suspicious' water buffalo. 

Orlando and Swados warily eye the house and house-wife ahead. 

 Private Orlando checks out another civvy, but all clear! She ain't VC.

He is. Sniper deploys and opens fire at Madden. 

Unwanted guest at the tea-shop, the VC rifleman giving the US guys up the road hell with an old Mosin-Nagant, that wall corner proved excellent cover. He wounded Madden, twice. 

Lucky shot, 40mm HE blast wounds the sniper. 

Cummings, veteran on the blooper, lots of support fire, good job. 

 Orlando rounds the small hut and flings his grenade into the tree line.
 Boom, 1 VC down, 1 pinned.

 Swados give Orlando covering fire from the bushes. Team work sorted both the VC out.

 The command bunker entrance in the trees. The guard just deployed to defend it. cadre is still inside.

 Getting wet. Sergeant Redecker crawls through the paddy, behind the bund, to try and reach the wounded Madden, but no joy. Accurate rifle fire, and an inaccurate rifle grenade, got his head down too. 
 The 'old farmer' appears beside Cummings, grenade in hand. Argh! Infiltrator, he lobs it into the undergrowth.

 Boom! Cummings is pinned, deaf, but not wounded. Luckily for him. The old fella then ran off with a surprising turn of speed.
 But Cummings gets his own back, a 40mm grenade explodes and pins the fleeing VC before he can get away off the table.


Quick Appendum to this; I thought I'd just continue the game by testing the campaign system I'm working on, that hopefully will be a big part of the final game. So, post-battle, having lost 1 man, I gain 5 new green recruits (FNGs), which fills out the platoon its it maximum size, so at full strength now - good. But, then it was transferred into a High-threat area, meaning the next game will be against tougher opponents, in a free-fire zone. I assume that a new Search and Destroy mission has been cooked up and the platoon are part of it. This bad news did not go down well, and reduced the platoon's overall morale slightly as third inter-game event. I guess some of the guys have a bad feeling about this next op.

As part of the post-game sequence you also get to generate the next game, which will be at High threat-level, of medium (2 squad) size. But the advantages here are the platoon will gain some platoon support options (weapons teams) and off-table fire support requests, so bring on the big guns (should they be needed). Still, those FNGs are in for a baptism of fire first time out.