Monday 31 January 2022

SOLDIERS OF NAPOLEON, DEMO-GAME

This was a ‘Corps’-sized game, that is 4 brigades per side, with 3 deployed on the tabletop and 1 in reserve. It was played on a 6x4, which is perfectly do-able, although we usually go 7x 5 for this.

The French force’s 4 brigades were: a French Infantry brigade of 3 battalions and an 8 pdr gun battery. This was regular and 1 veteran battalion. An Italian infantry brigade of 4 battalions, all poor infantry except the 1 grenadier battalion (these counted as regulars) again with a 8 pdr battery. And finally, a light cavalry brigade of 2 chasseurs regiments (both smallish) and a good Hussar regiment, with their own 6 pdr horse battery. The French reserve was a single Dragoon regiment, but again with a horse battery attached.

The Austrians matched this with an infantry brigade of 4 fusilier battalions and 2 landwehr infantry battalions with a 6 pdr battery in support. The ‘advanced guard’ brigade, a unique mixed brigade type (you can have 1) of a grenz battalion, a feldjaeger battalion and an uhlan regiment, with a horse battery of 6 pdrs in support. The third brigade to deploy was a cavalry brigade of 1 dragoon regiment and 1 chevau-leger regiment, no horse battery here though. In reserve, because they have to start there, was my grenadier brigade of 2 grenadier infantry battalions, marching up to my aid.

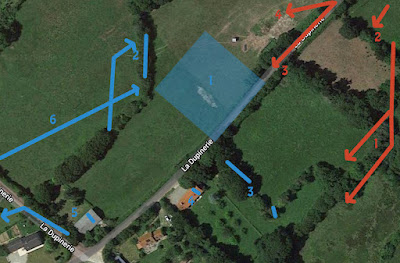
The French deployed with the Italians holding the farm on their right. The centre was the French infantry and the left his light cavalry. The reserve dragoons were pre-arranged to arrive in the centre (so can go wherever they are needed fastest), from turn 3 onwards.

The Austrians deployed with the infantry brigade on the left and centre, the cavalry on the right and centre and the advanced guard out front, screening, in front of the infantry and facing the farm (they have to deploy furthest forwards as a restriction on using them). My plan was to attack and take that farm from the Italians. The light infantry would lead, with infantry moving through and finally, when they arrived on my left, the grenadiers would be the coup-de-grace force to assault and take the farm once the Italians had been well-mauled. The centre would be a feint attack, with 2 fusilier battalions and landwehr, go forwards, engage those French and keep them busy, try not to die too quickly. The problem was the left, with the cavalry facing off, he had a 3-2 advantage in regiments and a horse battery to help and I feared a swift move here would see him defeat my cavalry and turn that flank. My Dragoons would have to work hard to stop that, aided by the weak chevau-leger, but it would only be delaying action to buy time for the assault on the farm to break his Italians.

Two sample forces.

French
Italian Infantry Brigade

Infantry battalion (militia)
Grenadier Battalion (regulars)
8 pdr foot battery

French Infantry Brigade
Veteran Infantry battalion (veterans)
Infantry battalion (regulars)
8 pdr foot battery

Light Cavalry Brigade

Hussar Regiment
Chasseur Regiment
Chasseur Regiment
6 pdr horse battery

Dragoon Brigade - Reserve
Dragoon Regiment
6 pdr horse battery

Austrians
Advance Guard Brigade

Grenz Battalion + Jaeger detachment (militia)
Feldjaeger Battalion (veterans)
Uhlan Regiment
6 pdr horse battery

Infantry Brigade
Fusilier Battalion (regulars)
Landwehr Battalion (militia)
6 pdr foot battery

Cavalry Brigade

Dragoon Regiment
Chevau-leger Regiment

Grenadier Brigade  - Reserve
Grenadier Battalion (veterans)


On to the action…

Well it started well enough, the light infantry deployed in extended lines (skirmishing) and sent out their own skirmishers, and the jaegers and grenzer were soon hurting the Italians with accurate fire. They, in return, deployed their own light companies to fight back, but the Austrian uhlan, as light cavalry, send a harrying squadron to drive those enemy skirmishers back in (something light cavalry can do is chase-off enemy skirmishers). The Austrian's ace skirmishers, rifle-armed, were making life hard around the farm. In the centre my ‘feint’ pushed up and the French moved up as well – careful, not too far. The landwehr battalion formed line and started to get some volley’s in, lucky that, for once, the French gunners were rolling poorly and missing them. Landwehr militia are not easy to rally once the damage builds up. On my right, French left, his cavalry raced up in march columns (so very fast) and then deployed into lines, his battery with them deploying and opening fire. My dragoons wheeled right to face his hussars. If they came, they were ready to counter-charge (something all cavalry can do, even if they are not the target of charge, they can try and intervene, it's worth keep reserve cavalry back for this, although I didn't). My chevau-leger went forwards to round the small wood and draw-off his chasseurs, but heavy Voltigeur fire and many cannon balls sent them falling back in disorder and needing rallying, which they did. But yeah, too much fire that way. Best hang back.

Initial moves over, I made my first mistake and pushed my uhlan, on my extreme left, up to charge his Italian gun battery, only for them to not charge far enough and catch horrid canister fire from the battery. As men and horses died, the uhlan broke and fled… drat! I had been too eager and got them destroyed for nothing. Still, their threat had forced the Italian grenadiers into a square and that is bad news if enemy guns or skirmishers are targeting you, and my grenzer were. Units in square cannot skirmish back to defend themselves and are easier targets for gunners.

Time for the Austrian infantry to push on, and they moved up and through the light infantry skirmish lines and engaged the farm, were one wavering Italian battalion broke and ran. In the centre, my volley firing fusiliers and landwehr were holding their own and then drove the French back, to rally and regroup in some disorder. Hurrah! Keen (again), I followed up and sent one fusilier column charging in, only to lose the melee and be repulsed. I must stop being so aggressive and play a longer game… tbf, I thought I win that fight and break his battalion and rolled poorly (just blame the dice!).

On the right, his hussars moved up so my dragoons spurred in and attacked them, to fight a very inconclusive melee and we both fell-back, regrouped, formed lines again, and got ready to try again. The dragoons and hussars would fight it out 3-4 times here, with neither getting a decisive advantage until the last turn of the game. It was even, his hussars were better trained and led by a heroic commander. My dragoons were heavier cavalry though with shock impact…

The French reserve had arrived, his dragoons galloped to the right to aid at the under pressure farm, where I had no cavalry to match them (I needed those uhlan now). The French horse battery deployed and started adding its fire to the Italian battery which was doing heroically, under heavy jaeger rifle fire but still blasting away, before 1 gun crew broke under the fire (the full caissons had long been emptied and retired). The arrival of the French dragoons gave my fusilier's attack columns pause and they started to take morale tests for the cavalry ahead, threatening to charge them. Heavier cavalry (or lancers) can just intimidate the enemy by hanging about.

In the centre, the French had recovered a bit and their skirmishers were now shooting up my columns, the brave landwehr had to fallback, leaving many dead behind. The centre as crumbling, it was time to go at the farm, now or never. Meanwhile, my reserve grenadier brigade had arrived. Fearing his cavalry outflanking me, I had sent back orders to divert the grenadiers in to the centre and then formed a new blocking line, stopping them from joining my attack, but securing the right flank with two good infantry battalions that his light cavalry would be unlikely to break. It felt safe there now.

At the farm, my fusiliers finally closed in and charged home, driving one, then a second Italian battalion back at bayonet point, out of the farm buildings, hurrah! But the losses where mounting for me too, mostly from artillery. I had lost my own horse battery now, it limbered up and fled when his cavalry showed up. Still, the Italians were still only in the fight because of the many Rally cards he’d spent to keep them there. It had been costly and stopped his attack in the centre or with his cavalry on the left. In Victory Points gained, it was very close, the Austrians just ahead and both sides close to breaking off and retiring for the day. In the next turn, somebody would break.

As it happened, both broke. My dragoons used a ‘fierce cavalry charge’ special event to rush in and defeat his Hussar once and for all and they fled, breaking the French army. But, in the centre, my ragged fusilier and landwehr battalions also suffered more musketry damage and the landwehr broke, along with the hard-fighting feldjaegers, would had been engaged since the start and were probably just out of ammo and bit peckish by now. That was enough for both sides to gain enough VPs to break the opposition. A draw then… maybe marginally to the French on damage inflicted to my infantry… but too close to call really.

An excellent fight, no quarter asked or given… a bloody day for the Italians, their brigade shredded. I feel I wasted my grenadiers a bit, but he only didn’t press his cavalry attack because they were there. If I’d have sent them quick-marching on the farm as planned, he’d have no doubt pushed harder here and maybe turned the flank, broken my cavalry brigade and won the day. Still, proud of my Austrians, for once not a good kicking of the French.

Soldiers of Napoleon is now a done deal, finished writing the rules, awaiting production to turn it into a nice book and set of action cards. Sometime in ’22, with a following wind…

A few quick snaps of the action. Not many, too busy playing for that. That was such fun, we’re going to do it again in our next game. 
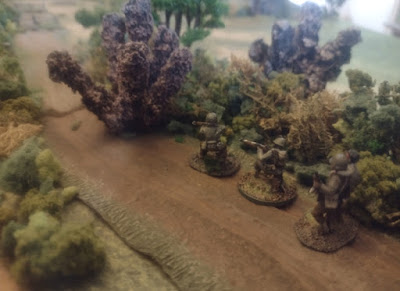
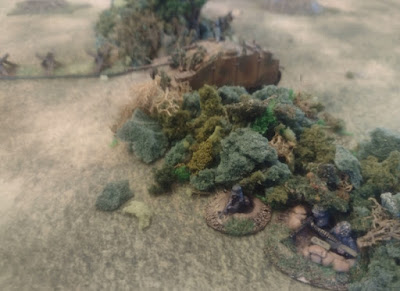
The 
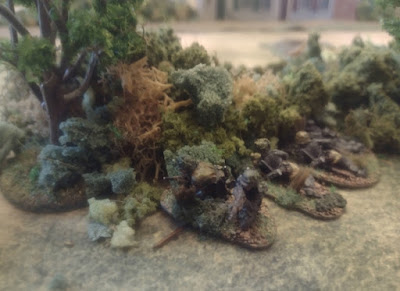
crux of the battle, the Austrian assault on the Italian farm. Jagers and Grenz are skirmishing, before the fusiliers in attack columns move through into the assault.


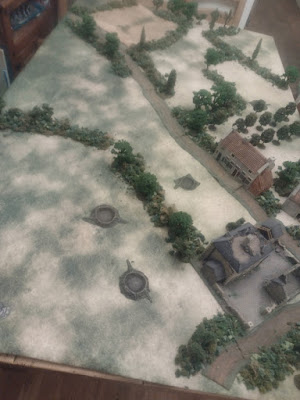
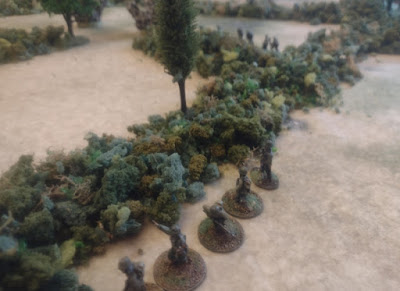
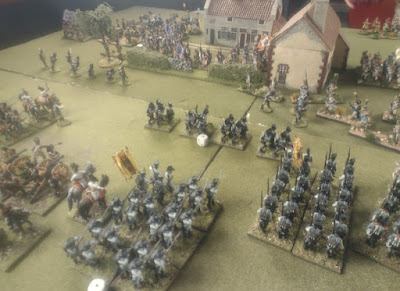
Italians, grenadiers, battery and infantry deploy to the hold the farm area. Behind the 8 pdr battery has 'full caissons' upgrade, so is well stocked with ammo. They'll need it.

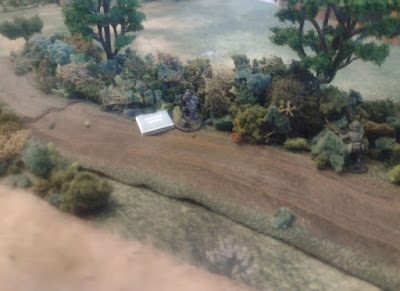
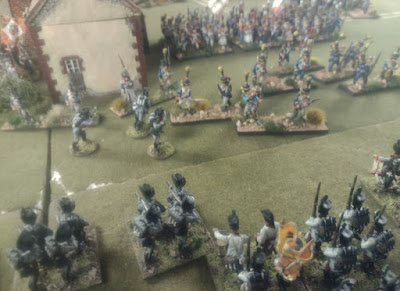
French Voltiguers, in force screen their centre. A stalemate here, but it was only a feint attack anyway, to hold the best French infantry in place.

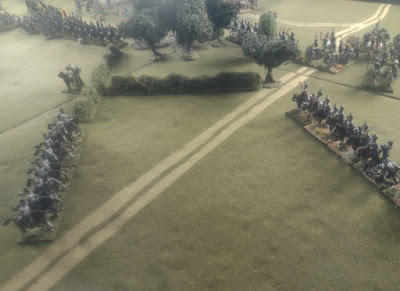
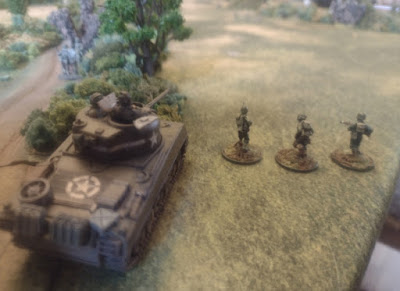
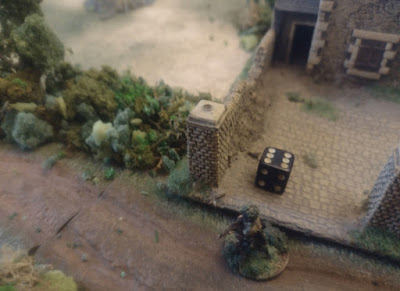
The far right of the Austrian line, hussars approach in line as the dragoons wheel to face them. His horse battery is in support. This cavalry fight would flare-up and subside through the battle, eventually the white dragoons could claim the win...


Wednesday 19 January 2022

ATTACK ON LA DUPINERIE, Play-test skirmish game with 'Frontline'


US attacking in platoon-sized action, ‘All Out Assault’ intensity, ‘Secure the Assembly Area’ scenario.
 

Blue (German) 1. Minefield. 2. Squad + MG team. 3. Squad + MG team. 4. Sniper + MG team. 5. Platoon HQ and runner. 6. StuG III G. Red (US) 1. 1st squad. 2. 2nd squad. 3. 3 squad, FOO and sniper. 4. 3rd squad BAR team and Sherman.

An early of trial for a WW2 skirmish game, working title ‘Front Line’ set at platoon level (with support). Play-testing of the first draft is on-going, but their is a lot to do, as I want it to be really good and offer a very gritty and ‘tough’ game play… high verisimilitude. Anyway, many ideas to try out, some heavily borrowed from work on Nam’68.

This game was a ‘Battle’ scenario in ‘All Out Assault’ intensity (i.e the highest, so heavy fighting, lots of support for both sides), with the US attacking to clear the Germans out from La Dupinerie. Their platoon was a new one, all new recruits, the advantage here being in numbers (so, at full strength with all their gear). The defending Germans were not a full platoon, but more experienced and dug-in under the hedges and with a mixed minefield blocking the road.

Before starting, the US used their preliminary bombardment of 105s on the buildings, but to little good effect, then began to move on to the tabletop along and either side of the lane. 1st squad would hook left through the trees and hedges to try to outflank the position, whilst 3rd squad engaged with suppressing fire up the road, aided by the Sherman, sniper and then the off-table mortars. 2nd squad was the reserve, ready to replace 1st or 3rd squad's job if they got badly hit.

The Germans held their positions and waited, until an MG-34 from the US right opened fire, resulting in return HE fire from the Sherman tank that pinned the MG crew in their foxhole under the hedges, but not before 2 GIs had dropped, hit by the fire. Another was then hit by the German sniper in the building as they moved up the lane. 3 men quickly down.

The US platoon had all deployed and 1st squad was making its way cautious forwards, unmolested. 3rd squad was pinned down and then hit by German artillery as it slammed down into the cornfield and lane, resulting in a few more casualties and more pinning, including the mortar FOO who had scurried forwards from his Jeep (left back in the lane) and was now hiding in the ditch. The US quickly needed their support fire against those hedgerows and buildings. A second MG-34 had opened fire and lane was now a very unhealthy place to be, cross-fire!. The US stretcher bearer team came forward to try and aid, but was also sent cowering into the hedgerow by MG and sniper fire. It was hot on the right.

Now out of supporting IDF, the German platoon HQ dispatched a runner. These can carry a message to company HQ to ask for more fire, it takes an extra D6 turns once the runner leaves the table edge to reach the HQ. He rolls a 6, so a long way to run to ask for more mortar fire. Meanwhile, the Sherman tank had unpinned (from the arty stonk) and was hosing down the hedge ahead with MG fire. On the German table edge, their first reserves arrived, a StuG. It rumbled up to the hedgerow and took aim at the Sherman, which in return failed to spot it… oh-no! (advantages of StuG's low profile!). The Sherman crew were obviously too focussed on blasting the hedges. The StuG fired and and scored solid hit on the Sherman turret. Before the Sherman could react, the StuG had reloaded and fired again, with a second shell hit on the hull this time. We rolled and both shells defeated the armour, so 2 penetrating hits. The first wrecked the Sherman’s main gun and wounded the gunner. The second was catastrophic, ammo detonation. 3 crew managed to bail-out as the fireball ripped through the tank, but the driver the radio-op were trapped inside, and killed.

Meanwhile, overhead a P-47 raced in and strafed the hedges and crossroads with its many machine guns. This resulted in pinning a German squad, but not the StuG.

Despite the air support, the fiery loss of the Sherman was enough for the US attack today. The platoon pulled back, the lane to La Dupinerie was just too hot. The platoon had lost 9 men (not including 2 tank crew), almost all from 3rd squad. The Germans had lost, err… nobody… not 1 casualty. Hmmm??


Well, I really like that the losses seem something closer to realistic, but the Germans, in good cover in defence were very tough, too tough maybe. That needs re-balancing, the defender needs to feel under pressure as well, and here they didn’t. They could just sit tight, blast away with MGs, the sniper and then the StuG and the US advance just stalled. To counter that, the US never got their mortars in the action and were unlucky to lose the Sherman so quickly, in a flurry of good dice rolling by the StuG (it needed 6s to hit and did it twice!). 

La Dupinerie was still very much in German hands… pullback, shell it, and try again tomorrow! 


US FORCES                points        MV    Notes
Platoon
Recruit Infantry Platoon        161        19    see Quirks
Bazooka Team            10        3    3 men
Sniper                    5        0    1 man
(Stoic Recuits)

Platoon is: PHQ - 5 men, 3 Rifle squads - 6 men, 3 BAR squads - 5 men, 1 Bazooka team - 2 men, 1 Sniper - 1 man

Platoon Quirks
Flaw: Fatigued, -2 to MV
Advantage: Extra Supplies. All have ‘extra ammo’ for ammo tests. +5 points

Support (5 max)
Stretcher Bearer Team        8        3    2 men, Medic
57mm anti-tank gun+ tow        47        3    6 crew, in Reserve
M4 Sherman                52        4
Mortar FOO + Jeep            19        5    2 men

Off-Table Fire Support (4 max)
105mm Preliminary Bombardment    54        0    4 tubes
Interdiction Artillery Bombardment    20        0    3 dice
On-call 81mm mortar battery        38        0    2 tubes

419 points, 37 MV


GERMAN FORCE
Platoon
Hardened Grenadier Platoon        177        29    see Quirks    
(Stoic-Veterans)
Platoon is: PHQ - 4 men, 2 rifle squads - 5 men with 1 Pzfaust, 3 MG-42 teams - 3 men.

Platoon Quirks
Flaw: Under Interdiction Fire, -1 off-table fire support choice
Advantage: Venerable Sergeant. His squad is Fervent +5 points

Support (5 max)
Sniper+Observer                13        4    2 men
Stretcher Bearer Team            8        3    2 men, Medic, in Reserve
StuG III G                    58        3    in Reserve

Off-Table Fire Support (3 max)
Pre-planned 105mm
artillery bombardment            72        0    4 tubes
Pre-planned 81mm
mortar bombardment            15        0    2 tubes
Artillery Interdiction Bombardment    20        0    3 dice

Defences
Small, high density, mixed minefield    20        0    10x10, 4+
Foxholes for 11 men            22        0    3+ cover

410 points, 39 MV

La Dupinerie battlefield, Germans this end, US far end.

German riflemen lurk in the hedges and wait the arrival of the US troops, after the brief 105 shelling had ended.


GI arrive in the field, leading the Sherman and quickly draw machine gun from the hedge ahead. Time for all hell to break loose.

German artillery impacts on the lane, and makes more of a mess of 3rd squad.


The FOO team runs for cover and gets a special counter, Good Cover, so his new ditch is obviously deep. Good position if he could get unpinned and get those mortars firing.


Two teams of 1st squad work their way left, but never got to attack the end of the German position. Too much carnage back on the lane.

German platoon HQ's runner is off, to request more mortar support... and he rolled a 6, so a long run.


StuG sneaks into a firing position as the German MG team is unpinned and opens fire again.


Sherman 'Indian 2-1' brews up... StuG got the drop on him... 


Jabos! A P-47 stafing run isn't enough to break the Germans. They still hold La Dupinerie.


Tuesday 4 January 2022

ADMIN BOX PERIMETER - Game 2 with BG Pacific

Game 2 of our narrative skirmish campaign in 28mm. The Japanese are attacking in a High Ground scenario, with my Brit’s dug-in, defending either side of a stream and nullah (ravine). My defensive system was simple, infantry sections dug-in in foxholes on either side of the ravine, each supported by either the Bren section or the Vickers MG team (with loaders) for firepower. Out front, 16” ahead of the man line, a PRTP that the Japanese would have to advance through. A battery of 4.5” guns off-table to hit one, a battery of 3” mortars off-table to hit the other, as a curtain of defensive fire in front, using harassing barrages unless the Japanese bunched up near the PRTP. In reserve, a spare rifle section to support an M3 Grant tank, a sniper team, the Tiger scout team and a mobile Bofors gun for AA cover. The problem was that with the Defences, the off-table guns and the PRTPs, all bringing 0 BR, the force’s BR total was mere 23… compared to the Japanese’s at 38.

The Japanese attack came on the left and right, not along the central nullah (it was well covered by Brens and the Vickers on ambush fire anyway), and thus through the PRTPs. They would pay for that as the guns rained down fire and caused repeated pinning and hits, making their attacks slow and uncoordinated. But the guns alone couldn’t stop them. The Japanese also had a PRTP, on the hill top and their off-table 90mm mortars hammered at it, until they ran out of ammo on turn 5 due to a special counter pulled. That left them just their 70mm battalion gun. They also used 2 timed 75mm artillery strikes on turn 1 to soften me up, with some pinning. But the bombardments had done some damage and on the right, left just 3 men in the rifle section to fight off the coming infantry attack.

On the left (Japanese right), the attack was led by a recce tankette, which was quickly KO’d by artillery fire, and the infantry held back rather than move up through the 4.5” shelling, instead waiting their reserves to join them, one in tracked armoured truck!

It had been a cagey first few turns with lots of IDF traded… and low orders rolls. The reserves arrived and moved up through the jungle. With the main pressure on my right, the M3 and following  rifle section went this way, to save the hill top objective, whilst the sniper, Bofors and Tiger scouts lurked behind on the left, a reserve of last resort.  

Trading fire into the dense jungle, my few infantry hung-on and saw-off one suicidal assault team, but the Japanese numbers were mounting. The M3 and infantry support arrived just in time and hammered 75mm HE into the undergrowth and rifle fire adding to the pinning. Japanese LMG fire and then their light mortars got me pinned down and I had to repeatedly unpin, costly in BR counters, but his anti-tank team was creeping up, unseen and now in close assault range of the M3, which went onto ambush fire, but was low on 75m ammo now, and it only has 1 MG! 2 man teams not firing are hard to spot.

On the left, the Japanese attack suddenly got going, when Orders allowed, and rushed up, taking ambush fire, but in a rude surprise, one squad were assault pioneers and had a flamethrower team attached. My ambush fire dropped a couple of his men (dense jungle is all 4+ cover) and the flamethrower let fly, frying my rifle section and forcing 2 more counters to be taken. His pioneers rushed in and tried to finish my Vickers team, but it was cut down, leaving just 1 man pinned (but still a threat for the Japanese). My left had collapsed, and the sniper team and Tiger patrol (just 5 men) tried to hold it. The sniper got his flamethrower (now empty though), but more enemy infantry were coming up and through my front line. My BR total was now at 23…

And then it was all over. His anti-tank team launched themselves in a close assault at the M3, ‘Banzai!’, which critically failed to spot their approach. Charging with the lunge mine the anti-tank grenade assault roll was a 6… a hit, and the M3 went up in flames and smoke (as did the lunge mine guy). That BR counter, the loss of the tank, broke the British. Time to fall-back.

So, after 2 games, it’s a win a piece. I actual caused more BR loss, 28 in all to the Japanese, but their fierce will to fight carried the day. Problem was with defending with too much off-table fire (self-inflicted). Nice to have the guns, but risky. More BR required next time.

The next game, with the Japanese still on the attack, will be their first assault up ‘Artillery Hill’, south of the Admin Box. If they can take it, they’ll gain bonus OPs and PRTPs and guns, etc, as they will have clear views over the box area below. It will be another attack/defence game, and another ‘high ground’ scenario, but this time with 1 big jungle hill (the biggest we can make). No vehicles are allowed, the hill is too steep, so an infantry-only fight.

Hills and jungle either side of a stream, running up the centre of the board.
Bren section, on ambush fire, dug-in, covering the nullah. 

Vickers and loader team dug-in on the edge of the nullah.
First enemy arrive and move up.

With some harassing fire from their little 70mm gun, on the PRTP, very useful in jungle conditions.

Reserves arriving, Bofors on ambush for the JAAF... a cheeky timed air strike is favoured enemy ploy. Oil drums are an objective marker.


Other flank, M3 and its infantry guard help to hold the hill top objective.
Tiger scouts hack their way up to reinforce the front line.
Here they come...

Last man standing, the pioneer commander is all that is left of the rush at the Vickers' position.


Japanese pioneers transport... we allowed 1 of these rare beasts for the campaign, it was blown up by a mortar hit...
Banzai, the lunge mine team gets through and scores a hit... 25th Dragoon lost a tank and crew.