Monday, 23 September 2019

Tank Battle at Maknassy, BG:Torch AAR

The game was a 800 point meeting engagement, US 1st Armoured Division vs DAK, and the randomly generated scenario was a Flanking Attack. The US tankers were approaching the outskirts of the town Maknassy when DAK forces launched a spoiling panzer counter-attack to help hold the town and the important mountain pass beyond.

The DAK force was a real mish-mash of armour, from a Pz II, several Ausfs of Pz IIIs and IVs (one lang, one kurtz), a captured Valentine(wild) and a Tiger (eek)… so a bit of everything, 9 panzers in all. They’d be facing 3 Stuarts, 3 Lees and 3 Shermans (and god knows how I’d stop that Tiger). Infantry; I had an inexperienced armoured platoon in their half tracks, the Germans, reg grenadier platoon, all just tank riding to start with. I had invested points in artillery, with an off-table 105 battery and a T19 battery (with required supply truck of course). His was again a mish-mash, 2 timed 105 strikes, an on-table 80mm mortar (that proved a real pain) and a 150mm Bison (and required resupply truck of course). He had a timed Stuka strike… I had no air support (unless I could get lucky with chits).  For recce; for me, just 2 jeep teams, one with an MG, one as the officer and arty spotter (handy with guns to call-on). He had thus out-scouted me, with an 8-Rad, sniper, kradschutzen MG team (Kettenkrad subbing in for Zundapp and sidecar), and his own recce officer in a light car. First chit to me for the scouts. In all, my BR total was 47, the DAKs, 56… one well, that off-table artillery is expensive, brings no BR, but hopefully it would do its pinning business when I had my spotters in place.

My plan, after rolling the scenario, was to try and use my Stuarts and half-tracks speed to get to those objectives. With his recce troops out front and waiting tank support, I thought I could jump them early, out-match them with my light tanks and destroy them in detail to get to those objectives and harvest counters. Meanwhile my recce would hang back, call in artillery fire on the town and harass his tank’s advance. Then, when my tanks had arrived, I’d attack  towards town, but only against well pinned enemy tanks, who would be under all those 105mm guns ever turn. Those guns were key, keep them firing, I had 5 artillery spotters on the table to do so. Hopefully, I was playing to the US’ strengths. 

It started well (for the Germans) with the first turn, out-scouting me, taking objectives and his first Bison 150m shot scored a lucky direct hit with one of my recce MG jeeps - messy. 4 counters before I had a go. Grin and bare it, my first turn and I got the guns firing into the edge of town. A lucky deviation resulted in the lurking Bison taking a direct hit and being destroyed - result! That shut him up!

Initial skirmishing complete, Panzer IVs arrived and they moved to his right, my left, to reinforce his recce troops. But they had a long way to move-up, so I still went with plan A - attack, attack… my Stuarts rushed his recce troops, MGs blazing, and his recce screen tried to fall back. His sniper was killed, the 8-rad armoured car shot from the rear as it tried to escape (bouncing 20mm shells off the M3’s front armour as it went), his MG team was wiped out in another 105mm stonk… and his recce commander was pinned, then a turn later wiped out. Only the 2 soft skinned transports escaped the mauling, withdrawing off the table to save the imminent extra counters.I took the objective too… so that was 4 chits for the Germans (take that!).

It had worked, but now my Stuarts had 2 Pz IVs to face down (including the ‘special’ on ambush fire) and the captured Valentine. A tough nut, and it became cagey… both waiting on ambush fire for the other to come forwards in a Mexican stand-off. At least I was still shelling him.

In the centre his Panzer III N and Tiger were in close co-operation… a timed Stuka strike KO’d one of my Shermans (large bomb, direct hit!), but my artillery was now becoming dominant (and using a lot of my Orders)… but pinning his Tiger each turn. So far had got 1 shot off, a miss. The Panzer III N took the table-centre objective, and was then KO’d in another artillery stonk. My plan was working. We had a short break (for tea), and I had taken 7 counters… the Germans 12… US on top.

After the break, the German fight back began. My artillery so far had rolled really well… now the luck changed and the direct hits dried up as did the pins on enclosed armour. On my right, my recce artillery spotter team had to evacuate their post, jumping back in their jeep to fall-back, when 2 Pz IIIs came looking for them. I countered that with my Lees, moving up to engage. In the first exchange of fire I lost a Lee, him a Pz III, and then we both began failing ever penetration roll required after hits… glance, glance, glance…  that dual would continue for the rest of the game. A lot of 37mm ammo was used to little effect.

The fight was now on my left, my dismounted infantry pushed up, captured the central objective, but the artillery support let them down for a turn, and suddenly they were under heavy MG fire from panzers, pinned, then the squad was wiped out. The Tiger’s 88 roared again and another Sherman, which had been furiously using HE to try and keep it pinned, was turned in burning scrap. Lost that dual.

Those Panzers IVs finally tried to break the stand-off on the left, moved forwards to get lines of sight, I missed with the ambush fire (drat) and the 75mmL48 gun wrecked the platoon HQ M3 with ease. My return fire did KO his PzIV kurz with a side shot… still, that ‘special’ was too much for my 2 M3s, and they had to pullback and lurk out of sight again. It was now very close… but the tank fight was edging the German’s way. His annoying Valentine scored a 6 pdr-kill on one of Lees, but was then out of ammo (and it has no MGs!). It was useless now and withdraw back to town. The Tiger then rolled forwards to claim the centre objective back again, and that last counter pushed me over my BR total. The Germans had lost 50 BR from their 56. I had lost 48 from 47. A narrow German win… 2 more counters (maybe) would have done it! We had inflicted 20 counters each on each other.

4 hours of play and a really good game. After a bad start I was right on top at the tea break, and the DAK were a bit glum (mostly because his Tiger had been pinned for 4 consecutive turns and drawn 4 counters just to unpin it). My arty had was causing havoc. But the German tanks then showed their quality and edged the tank-vs-tank engagement. His slightly better BR had just won it for him.

Here are some shots of the Maknassy battlefield. The edge of town, surrounding fields and cactus patches, a farm, and two rocky-topped ridges over a shallow valley. Next time we’ve decided to go Ostfront, 1941 with Barbarossa, my Russians will be defending on day 2 of the invasion.

And finally, some snaps of the game in progress.


 US recce watching town from a cactus patch

 Sherman on high ground watching the valley into town

The edge of town, DAK arty spotter lurking in his funny little vehicle. 
His job, to spot for the Bison was soon redundant. 

Rocks on high ground, over looking the central objective, marked by the crashed Spitfire. 

Recce jeep meets 150mm Bison shell.  Ouch!

M3s arrive and charge to tge opposite valley side, where the DAK recce are lurking.  
(OK, my M5 models are standing in for M3s, not something I'd usual do - must paint M3s)

Time air strike scored direct hit on the covering Sherman.

Recce officer and arty spotter in place to watch town and get those guns firing. 

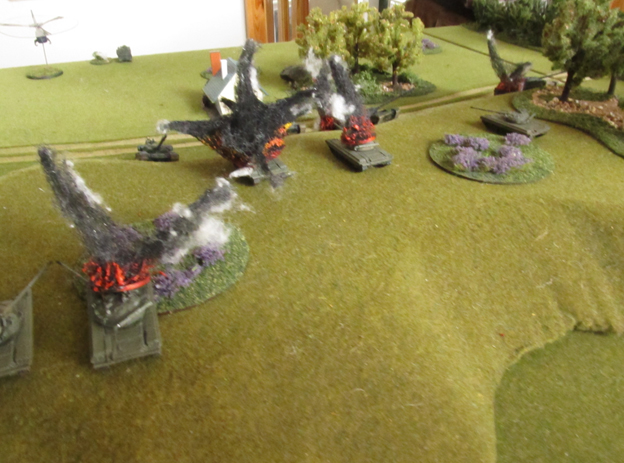
Tiger and his little buddy move towards the centre objective. 

80mm mortar shell wrecks an M3 after unloading its MG teams into the rocks, 
to cover the infantry across the valley. A single 80m mortar would continually score direct hits.

Hunt the 8-rad! 

 M3 Lees arrive and move right to engage his Pz IIIs. 
 
 US armoured infantry takes the far ridgeline, swiftly moving up behind the M3s 
and claiming an objective. 
 
Arty pinning... the bane of the Tiger (and soon to kill the Pz III N). 

Almost ready, M3s, with T19s arrived behind and firing a lot of shells over the ridge. 

One scored a direct hit!

Recce officer escapes, as the M3 Lees engage

Lee on higher ground with great LoS. Until the Valentine spotter him and it turns out, 
the 6 pdr is pretty good at tank-killing. 

 
Annoying to be KO'd by your own side's equipment. The captured 6 pdr Valentine. 

Pz III in the cactus patch, it survived 4 hits which glanced off (I cannot roll 6+ on 2D6). 

T19s rearm, as the comms relay team do valuable work closeby. 

Pz III gets another Lee. 

 US infantry get to the central objective, but are quickly pinned, then gunned down. 
 
Covering Sherman takes an 88 hit, KO'd...  Tiger's only victim.

 DAK man-of-the match, and still haven't ever actually killed a Tiger on the tabletop. 


Sunday, 28 July 2019

Erfundensdorf, game 4. Advance along the HelmingstraBe.

We have resumed our FotR (roughly April ’45 I think) campaign set at the small (made-up) town of Erfundensdorf, from earlier in the year. The arrival of Spring and the cricket season meant Friday evenings were not longer free for BG gaming, so we put it all on hold until autumn, except for this Saturday evening… basically, we had some free-time so sneaked in the next game.

So far, the US armoured division attempting to surround and take the town has won all the previous 3 games, but have only really been facing some ersatz equipment, local Volkssturm and a single veteran fallschirmjager company stiffening them up. The US tanks and recce taskforces have captured 3 approaches to the town itself and today would be after the main road from the north-west, HelmingstraBe… and clearing the German strongpoint holding it at the Rubelzahn farm.

The defenders (me) would again be the last of the FJ, a platoon dug-in into foxholes, behind log barricades and holding the well-fortified farm. They had a Hetzer, PaK-38 and an ’88’ with them covering the road which was also blocked by a minefield. Reinforcements would come from town in the shape of more Volkssturm and 2 Jagdpanzer IVs (only L48s though). My big hitters were off-table 150mm Nebelwerfers.

The US’s heavyweights of Taskforce Elgar were tasked with clearing the farm and road. An M26 Pershing platoon, backed up by M36 Jacksons, an armoured infantry platoon, off-table 105mm guns and a flanking force of 3 more Shermans and one of the infantry platoons tracks. Their mission had a high priority because from here they can encircle north of the town and cut-off the road leading east, where German reinforcements are on the way, fail here and those tanks will get through automatically… breakthrough and they can fight the next battle to try and stop them in campaign turn 2.

This would be the last of the 4 morning battles before moving into the afternoon.

We used the Strongpoint Attack scenario, slightly adapted, with roughly 750 pts each in a platoon-sized game.

It started with the US dropping in their first arty fire, to little effect and the FJ all getting onto ambush fire. A 105 shell did pin my 88 - unlucky.

The first turns would be cautious, with the US lacking orders (twice rolling double 1), and some long range AT fire from me to no effect. The US decided, given his tank-heavy force, that KOing my AT guns would be his priority and targeted them with lots of HE suppressing fire, keeping their heads down. A few turns of rest-bite from the US arty soon ended and farm was under fire, spotted by the armoured infantry platoon HQ away at the back - an easy day’s work for those guys.

I had off-table 150mm Nebelwerfer fire to launch and did so, causing some pinning and destroying an unlucky Pershing with a direct hit. My PaK-38 got a shot off and KO’d a Jackson that had ventured out of the woods and into the open ploughed fields. So far so good, but my 88 couldn’t get any shots off, and when it did, failed to spot (a lot of smoke and dust from those arty and werfer strikes obviously).

The US infantry pushed towards the farm but, in a rookie move, dismounted from their M3 in front of a 2 ambush-fire waiting MG42s. Caught in the crossfire the squad routed, leaving the M3 to trade bullets for the rest of the game. Short on infantry the attack was stalled, but hammering away at range. Both sides had an ammunition problem, no supply trucks on either side. My lurking Hetzer peaked out at the farm to take a shot, glanced a shell of a M26’s front armour and was hit by 90mm return fire from a Jackson, brewing it up. Oh well, it only had 1 shot left anyway.

So it went, a duel at long range. The US flanking force drove in and added their weight of fire to the shelling, and the arty zero’d the farm and pounded it to rubble, pinning most inside. My Volkssturm platoon arrived, woo-hoo, with 1 squad launching a quick counter to hit a Pershing with their ‘faust., only to again glance but pin it. More werfer fire, more pinning, 1 M3 half-track destroyed and the US chit counter was building. Then disaster for me, my Pak-38 was hit by Pershing HE fire and the gun destroyed - the crew ran… drat. Then an AP shell hit my ’88’ (a 6 rolled) and smashed a 90mm hole through it… again the crew ran. Double-drat.

All I had left was my 2 JgPazner IV, and as they rolled on to engage, an ambush fire long range snipe from the distance Jackson (in the woods) hit and KO’d one on the table edge… 90mm guns are rather good. My last AFV fought until out of ammo, hit and glanced off a Pershing, then KO’d a Sherman … then withdrew ammo pins empty. I had no AT shots left and was being pummeled. When a FJ MG team was machine gunned down the resulting chit broke my BR total of just 32. I had inflicted 36 BR loss of the US, but their total was 44, still 8 short. My defenders had hung tough and fought it out, but in the end, they had to give up that farm, another narrow US win.

Here are some pics of the actions. On to game 5, Taskforce Elgar trying to intercept my reinforcements before we get to the grand finale of the campaign, game 6 and storming the town itself from various directions in an ultimate Hexenkessel.

HelmingstraBe and the Rubelzahn Farm from above. 
FJ deployed at the bottom awaiting the US heavy-weights.

 US end of the table, heavy wooded, then open fields.

FJ dug-in to foxholes screen the farm

First incoming shells scream in. 105s... 

FJ 88 awaits on ambush fire, with a loader team, in a gun-pit. 


The farmhouse strongpoint, spotters and MG teams


Pak-38 on ambush and the rest of the platoon. This 'hedge' had a ditch, making it hard cover.


Hetzer gotta hetz...

... or not. Ko'd in the farmyard by 90mm return fire. 

Armoured infantry claim an objective (marked by KO'd Sherman), on the edge of the woods. 

 First werfer strike

Victim of the PAK-38... TDs ain't tanks!

US infantry support dismounts from track, under ambush MG fire. .30 cal team forgot its ammo!

Squad out! Pinned, then MG42s cut them to pieces quickly.


 88, pinned again

 2nd werfer strike

M26s push on through the ploughed fields on their left, firing as they come.


 Volkssturm break cover to sneak a 'faust shot... hit, glance, pin... run-away. 

 Jgpanzer IV arrives and dies... long range sniper shooting from a Jackon at 60". 

Good shootin' Tex! TD does it's job. 

 Volkssturm reinforce the farm, hiding in the barn from incoming artillery. 

US armour in place, shelling and MGing all before them. 

 Last of the defenders runs out of ammo, time to go... another small patch of the Third Reich lost.


Thursday, 25 July 2019

Next NorthAG playtest

Another trial game of NorthAG, this time to really test out the Warsaw Pact 'Breakthrough' special rule... which allows them to press on across the table to exit it, and win a gane that way, rather than in a straight stand-up fight. It is optional though, so the NATO player won't know until during the game if the WP are playing breakthrough or not. I got the drop on NATO here until his reinforcements started to roll in to block me - bound to happen, and it wouldn't be much of a game if I just raced off the table before he could react and it was game-over! No... this worked well, and despite heavy (huge) Russian tank losses, it almost worked. I got 9 units off the table edge (so 9 counters for the NATO side) and that almost broke him... but not quiet. In the end the losses cost me just too much... 18 from 20 tanks KO'd... but it is the motorised infantry you want to get through...

Another good game, very little to alter this time, no gunships showed up at all this time (my CAP helped here)... and my AA finally scored a first kill, SA-13 finally gets Gazelle scout helo!

Here are some pictures from the charge... a real close quarters brawl in the end as the British fought desperately to stop the breakthrough, and used every '66' they had in the process.

CAP - was useful this time, no aircraft to shoot down, but stopped a Lynx turning up. 

Russian BRDMs in the woods, 1 got away, 1 broke down and was abandoned.

Scorpions come forward to inspect the wooded ridge, and threaten the objective up there. 

Sagger team cover the ford on my right... small diversion here to hold Brits whilst and launched my tanks and BTRs at the left flank.

 The diversionary tanks... facing 3 Chieftains, best play hide and seek. 

Chieftains guard the ford, Sagger missed then ran out of ammo. 

Red armour coming over the wooded ridge on my left.

Timed rocket strike hits the objective and dug-in Brits near the Schloss! 

Scorpions meet their match on the ridge, then turn and run.

Brits claim the Schloss objective, resupply Stalwart arrives to re-arm the MILAN team.

Red armour heads down into the valley and races for the far table edge. 

First MRP follow the tanks. 

SA-13 get to the high ground before locking-on to the Gazelle and downing it! 

Red armour reaches the far hill, as the reach the hill line, the Brits are waiting on ambush fire. 

Brits have rushed into place. Rear slope defence. 

Brits secure the village, and set up their Rapier battery. 

Kaboom, the hill turns into an inferno. First wave taking a beating, but the breakthrough is still on. 

Following nfantry threatening to get clean through.
 
 One tank gets through and off the table edge, past the dismounting British infantry.

 Whilst the battle for the hillock, a brawl at under 10", continues.

 Another one survives the inferno and gets off the table... but it wasn't quiet enough. Exciting though, which is the point.