|
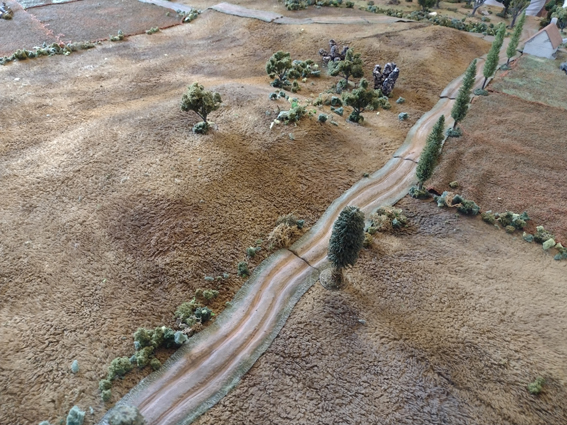
The Austrian centre advances up the hill, jaeger detachments deployed as skirmishers.
|
This a short article describing, in detail, a single turn of a game of Soldiers of Napoleon.
This game is a ‘Corps-sized’ battle, with both sides commanding four brigades. It pits a French force verses an Austrian force, both using the 1813, War of the Sixth Coalition, army lists.
The French force consists of two infantry brigades, one light cavalry brigade and the fourth Imperial Guard infantry brigade, off-table, in reserve. The French are deployed with the two infantry brigades on the left and right, with the cavalry on the far right and forwards of the infantry. The Imperial Guard infantry are yet to arrive, but when they do, they will deploy into the centre.
The Austrian force is also two infantry brigades, the weakest on their left, the strongest in the centre. The third deployed brigade is a ‘forward deployed’ grenadier brigade, on the right. The grenadiers would usually be in reserve but have paid extra points to be pushed into the front line from the start. The fourth, reserve, brigade is light cavalry, not yet deployed and due to arrive in the centre from turn 2 onwards.
We join the battle at the start of Turn 2 of the game. So far, the French have been on the defensive, firing cannons and sending out skirmishers but they haven’t advanced too far. The Austrians have pushed forwards in the centre to claim a hill and the grenadiers have also advanced on their right, driven some French reserve infantry out of the castle/monastery building and one grenadier battalion now occupies that large building.
Dealing Action Cards
Both players will receive a hand of Action Cards for the turn, draw from the (well shuffled) Action Card deck. The number of cards is 2 +1 card for each command stand on the table. Both players currently have 3 command stands for their brigades (1 each) and a divisional command stand (themselves), for 4 in all. So both players will be dealt 6 cards.
This is the Austrian hand:

This is the French hand:

Each Action Card can be used in one of three ways: for Orders (the big number), for its Special Event or to Rally (the bottom box).
Initiative
The first play of the turn goes to the side with the initiative. Currently, this is the Austrians, with their more aggressive battle plan. The Austrians will then play the first card from their hand.
Austrian First Card
The Austrian commander begins by playing a card for 5 Orders on his central infantry brigade. This brigade (and only this brigade) can now use these Orders. Orders allow an infantry battalion, cavalry regiment or artillery battery (a unit) to do something, like move, fire, etc. It cost 1 Order for 1 unit to complete 1 action, for ever 10 paces away from its brigade command stand. So, at 1-10 paces, it is 1 Order to do something. At 10-20 paces it is 2 Orders. At 20-30 paces it is 3 Orders. Brigades that become widely dispersed are inefficient for using Orders. They tend to want to work together rather than allow units to wander off too far.
Being central to his brigade, the commander will give 3 March orders to 3 fusilier regiments, 1 Bombard order to his artillery battery and 1 Skirmish Fire order to another fusilier battalion, with attached rifle-armed jaegers to do that firing. All the units are within 10 paces of the command stand, so it’s 1 Order each for the full 5 used.
Each of the 3 marching fusilier battalions are infantry in ‘column of attack’ formation and so can move up to 6 paces. They do so advancing across the hill.
Next, the 6 pdr artillery battery bombards. It picks a target (a French infantry battalion, in range, arc of fire and line of sight). The battery is 2 guns so rolls 2 dice To-hit, which is then modified. The only modifier that applies is that the battery is in ‘impeccable order’ (i.e it is in Good Order and has no Disruption itself), so +1 dice. (in SoN modifiers change the number of dice rolled, not the value needed). 3 dice, and round shot hits on a 5+. The bombardment scores 1 hit, and the French battalion have to take it, as there is no save against artillery fire (there is against musketry). 1 point of Disruption is added to the French battalion (on a dice next to them).
For the fifth Order, the fusiliers skirmish fire. There are two ‘modes’ of firing, Skirmish and Volley. Skirmish fire has longer range (20 paces not 10) and isn’t blocked by terrain and LoS issues (the skirmishers move up). The number of dice rolled is equal to the firing unit’s Skirmish value, which for the jaegers is 2. So 2 dice. This is then modified by -1 dice because the target French infantry battalion has it’s own light company deployed (Voltigeurs are out counter-skirmishing). So, just 1 dice is rolled To-hit. The regular fusilier’s musketry score is 4+. The roll misses but, as rifle-armed jaegers, 1 dice per can be re-rolled (that’s the bonus for rifles, a single re-roll). The re-roll hits. The French may now make a single Discipline test against the incoming musket fire. Their Discipline value is 4+. The roll is failed and they take a point of Disruption from the jaeger’s rifle shots.
That is now 5 Orders all used, the Action Card is placed on the discard pile and it is the French’s first play.
French First Card
The French start out by playing a card for its Special Event, the ‘Reserve Redeploying’. This gives them a chance to choose a new area for the reserve brigade to arrive and re-roll which turn they might arrive on (sooner the better). Happy with the Guard arriving in the centre, but so far on turn 5, they roll for which turn the reserves might become available. The result is now a 3, so an urgent galloper has reached the Imperial Guard brigade commander to tell him to hurry up his battalion’s march.
There is chance, after any Special Event, that the player will immediately get another go. On ‘Reserves Redeploying’ this is 4+. They roll, pass and can play immediately again.
French Second Card
The next play is to give 4 Orders on the left infantry brigade. The 4 Orders are: first, a Manoeuvre to deploy the light company and more Voltigeurs come out from the veteran battalion holding the village and move towards the monastery which, at 19 paces away from the French infantry’s main body, is just in Skirmish Fire range. They’ll now be able to harass the grenadiers in the monastery with Skirmish fire.
Second, the regular line battalion out front, under jaeger fire, will return Skirmish fire with their own Voltigeurs. The French regs are Skirmish 2, so roll 2 dice, but the jaegers are deployed from the target unit so -1 dice. The Voltiguers roll 1 dice needing 4+, and hit. The Austrian fusiliers fail their Discipline test of 4+ and so take a point of Disruption from the Voltiguer’s fire.
Third, another reserve infantry battalion, currently in line of march formation having moved through the village streets, changes formation and are placed into line formation, far better for fighting and very good for Volley firing if the Austrians come within range.
Fourth Order and the brigade’s artillery battery bombards. It targets an Austrian grenadier battalion across the field and with 2 guns (so 2 dice) and is also ‘impeccable’, so +1 dice. It scores 2 hits (ouch!) and the grenadiers have to take them, gaining 2 Disruption from the accurate incoming round shot.
 |
French infantry and guns deployed to hold the village, at the rear, the monastery, scene of Turn 1 fighting.
|
Austrian Second Card
The Austrian commander next chooses to take the Battlefield Objective card he has, ‘Take the High Ground’ and keep it. He can claim the objective later and already has his troops on the hill. This will all be resolved in the End Phase (see later).
French Third Card
They use 3 Orders on the right infantry brigade. These 3 Orders will be for the brigade’s two artillery batteries to Bombard, but as one battery is 14 paces from their command stand, it costs 2 Orders to fire, using up all 3. The guns crash forth their round shot at the Austrians over on the hill. Both batteries are 8 pdrs of 2 guns and ‘impeccable’ (the Austrians haven’t been able to fire at them yet). Both roll 3 dice To-hit, needing 5s. The first scores 1 point of Disruption on a fusilier battalion. The second targets the Austrian 6 pdr artillery battery with counter-battery fire. This reduces the To-hit dice by -2 (batteries and gunners are far hard to hit that blocks of men), leaving just 1 dice. The roll is a 6, a hit, and the Austrian 6 pdr battery take a point of Disruption (significantly, they can no longer claim to be ‘impeccable’ and get the bonus dice when Bombarding).
Austrian Third Card
The Austrians use the Special Event ‘Artillery Bombards’, as guns to the rear or flank fire onto this tabletop. They target the French regular battalion threatening the monastery and, as per the event, roll 5 dice, scoring 2 hits. So, that is 2 Disruption on the French line battalion which is now at 4 Disruption on a 4 stand unit… so in serious danger (if a unit ends a turn with more Disruption that it has stands, it breaks and runs). The chance of another play after the Special Event is 5+, the rolls fails and so it’s back to the French player.
French Fourth Card
The French also use a Special Event, ‘Senior Officer Arrives’. They roll a D6 and score a 3, the Corps Commander has arrived to observe the field here – ‘Bonjour Marshal St Cyr’. The command stand model is placed on the tabletop, close to French table edge, his presence will give various small aids to the French. The chance of another play after the Special Event is 3+, and is passed, the French player can go again.
French - Pass
The French player has 2 cards left, the Austrian’s have 3, so, because they have less cards the French player has the option to Pass and allow the Austrians to play. They do, preserving their Action Cards for later.
Austrian Fourth Card
The Austrians use 4 Orders on their left infantry brigade. The brigade’s Orders see three battalions (two fusilier, one landwher) advance, in lines, 4 paces. The fourth Order is on the brigade’s battery of two 12 pdr guns. They fire at the distant, and inactive, French light cavalry. They roll 2 dice, +1 for an ‘impeccable’ battery, score 1 hit on the French hussars, so 1 point of Disruption is added to them.
French Fifth Card
With both sides with 2 Action Cards left, the French must now play, they cannot Pass. With Disruption building up on his left infantry brigade, the French player decides to Rally here. He uses the 5 card for its Rally, allowing him to try and rally any ‘Militia, Trained, Seasoned, Profession or Elite’ troops (so any unit, there are 5 levels of troop quality). The brigade can Rally the Trained, line infantry (those under jaeger and artillery fire) and the Militia quality reserve infantry battalion. The Rally is +1 VP, so the Austrians gain +1 Victory Point to their total for forcing this Rally. Victory Points are what eventually wins the game (see later).
To Rally, the battalions must resolve the following steps in strict order. First, ‘Rally by Withdrawal’. The units takes a full withdrawal move backwards and automatically lose 1 point of Disruption (from 4 down to 3 for the regs, and from 2 down to 1 for the reservists). Next, they ‘Rally to Colours’, rolling one dice for each point of Disruption on the unit and any 6s remove a point. The line infantry roll 3 dice and scores no rallies, then 1 dice is rolled for the reserves and again, not a 6. No Disruption is lost. Finally, the units may choose to ‘Take Casualties’. Each stand removed from the unit reduces the unit’s Disruption by 2 points. The line infantry removes one stand, so now becoming a 3 stand unit with 1 point of Disruption. The reserves don’t ‘Take Casualties’ and remain a 4 stand unit with 1 point of Disruption.
The two French battalions have been driven back with some losses but are still fighting.
 |
French light cavalry advance on their right, about to splash over the Grunbach.
|
Austrian Fifth Card
The Austrian command uses 5 Orders on his central infantry brigade again. The first two Orders are for Skirmish Fire, as two jaeger detachments attack the French regulars again, both rolling 1 dice each (they are Skirmish 2, but the target’s Voltigeurs are deployed). They score 2 hits though and the French fail their Discipline test and take them. They are now a 3 stands unit with 3 Disruption, dangerously close to breaking and under serious pressure even though they just rallied.
The third Order is for the brigade’s artillery battery, to Bombard. It targets the French artillery that hit it, with return fire, but with only one dice To-hit, misses.
The fourth Order sees a fusilier battalion currently in ‘column of attack’ formation change formation in a ‘line’. All the better to defend their hill.
The fifth Order is for the landwehr battalion, behind the fusiliers (but still within 10 paces of the command stand), move up the hill behind, as the brigade’s reserve.
The last part of any Orders sequence is for the brigade command stand itself to move. The commander repositions himself on the hill, to keep his entire brigade within 10 paces, and thus save Orders.
French Sixth Card
The French play 4 Orders on their light cavalry brigade. So far it hasn’t moved, but it will now. The 4 Orders are all ‘March’ Orders to move as the three cavalry regiments (2 hussar, 1 chasseur) and their 4 pdr horse battery, still on limber, all move up at speed. The command stand then moves up with them. The French cavalry are on the way, moving very fast, but still in ‘column of march’ formations (which is quick, but terrible for actual fighting). They’ll need to change formation soon.
Austrian Sixth Card
The Austrian commander doesn’t feel the need to Rally any brigades at the moment, and, as his central brigade had the last Orders, immediately giving them Orders again will incur a penalty for consecutive Orders (pushing units like this gains them Disruption, so, at need, you can do it, but it costs). The commander elects to use his last card play on the infantry brigade on the left, for 4 Orders.
With the enemy cavalry now moving up fast, the three infantry battalions change formation and form square. That will keep them safe from most cavalry charges. The last Order goes on the 12 pdr battery which Bombards again, with 3 dice and scores 1 hit and 1 more point of Disruption on the galloping hussars.
That all the Action Cards played, so we move to the turn’s End Phase.
End Phase
This is the book-keeping and it is done in a set order.
First, are any reserve available? The French Imperial Guard will only arrive from turn 3, so not for them. But,
the Austrian light cavalry can arrive from turn 2. With the divisional commander in charge here, the chance of their timely arrival is a 4+ (it is better with a Corps commander or better again with the Army commander present). The roll is a 6! The Austrian uhlan, chevaux-leger regiments and their horse battery are here and can be deployed on their central table edge, ready for Orders next turn. Just in time to ride out and meet that threatening French cavalry.
Second, are any command stands ‘At Risk’?. ‘At Risk’ means they are within 10 paces of any enemy units. In which case, there is chance they must evade the enemy. No command stands are currently within 10 paces of any enemy, so there is no chance of any commanders being ‘At Risk’ yet.
Third, are any units broken? No units have yet gained more Disruption than they have stands, so no units break, but the French line battalion with 3 Disruption and 3 stands means the Austrians gain +1 Victory Point for them wavering. 1 more point of Disruption would have seen them break.
Fourth, claim Battlefield Objectives. The Austrians are holding, and now reveal, their ‘Take the High Ground’ objective card. They have units on the hill (which is outside their deployment zone) and so gain D3+3 Victory Points. They roll and get the maximum +6. Morale is soaring, they have the high ground above the French and hold the monastery. The French have no Battlefield Objectives to claim at the moment.
Fifth, roll for ‘How Goes the Day?’. This is a roll-off to see if either side have gained any significant advantage on the rest of the battlefield (this tabletop isn’t it, the battle rages left and right as well). The roll-off uses 2D6 and is modified by a forces’ pre-game scouting, aggressive battle plan and commander’s competence. The Austrians have +5, the French +4. The Austrians roll 6, so score 11. The French roll 9, so score 13 and win, but not by enough, so there are no significant gains elsewhere on the battlefield (you need to double your opponent’s score), but the French will have the initiative and the first play next turn.
Sixth, is it the end of the game? Has either side accumulated enough Victory Points to reach the opposition army’s Break Point? The French Break Point is 31, and the Austrian VP total is now 14… so no. The Austrian Break Point is 28, with the French having 2 VPs, so also no – the battle will continue (it is only turn 2, some way to go, but the Austrians have started well).
Finally, deal cards for the next turn. The Austrian player will get 7 cards (2, +4 as all 4 brigades are now present, +1 for the divisional commander = 7). The French will also get 7 cards (2, +3 brigades, +1 divisional commander, +1 Corps commander = 7). After dealing 7 cards each, turn 3 can start, with the French playing first.