Monday 26 July 2021

SOLDIERS OF NAPOLEON, 1813 CAMPAIGN , GAME 3, THE BATTLE OF HASSALBACH

Von Klopp’s division are again in action, this time in a 4 brigade battle, with 3 initially deployed and 1 in reserve. Having randomly generated the terrain and rolled or the ‘Tactical Advantage’ (a slight one to the Austrians today), I chose to be on the defensive, occupying the village of Hassalbach and digging-in with another brigade.

My force and deployment consisted of the Light ‘Advanced Guard’ brigade (made up of a Feldjaeger battalion, Grenzer and a light gun battery) holding the village on my right. The left was an infantry brigade, behind their earth walls. The centre was a harder choice, another infantry brigade or the light cavalry? The cavalry was weak, after previous battles, and likely to be faster to arrive from reserve, but with no cavalry on the table I would be too vulnerable to his cavalry. So, in the end, I placed the light cavalry brigade in the centre and rolled for the turn in which my strongest infantry brigade would arrive, turn 4 - deploying to the centre.

The French, meanwhile, had also chosen a defensive deployment. An infantry brigade was dug-in opposite Hassalbach. The centre was his strongest infantry brigade, set to attack over the hill, where he had cannons placed. His right, opposite my ‘redoubt’, was a light cavalry brigade of line lancers, hussars and chasseurs-a-cheval, with a horse battery in support. His reserve brigade was his Dragoons, arriving in the centre on turn 2. So, we were set to battle. My plan was to sit back, hold the line, and await the infantry brigade which would counter attack up the centre, towards the hill. The French didn’t wait though…

Having spied the weakness of my centre, he immediately launched into the attack, sending his own cavalry racing forwards and deploying their light guns, round the hill and towards my centre. I had hoped to keep my light cavalry out of trouble, deploying in woods to avoid cannon fire from the hill… but they were now forced to react to his swift early move. Behind, his first infantry columns set-off in the centre as the first cannonades were exchanged. The French had more guns though…

At Hassalbach, we fired off some guns, to small effect, but the French made no move to attack the village It would be a stand-off here for the rest of the game. The action was in the centre and on my left. A quiet day for the advanced guard.

It was going to be hard to stop the French cavalry, but my skirmishers were soon out and sniping away from the cornfields. My guns added damage as they could, but my horse battery (a single gun) had to limber up and pullback to avoid being quickly overrun. One chevau-leger regiment saw a chance to charge his horse battery as it deployed and did so, only for his line lancers to respond in a counter-charge… they won that fight easily but my light cavalry had drawn his lancer’s sting (lances only work in the first charge of the game) and after the melee, even winning it, the lancers were in disorder, so not as effective as in good order (this is represented on the table by how neatly your bases line up). He’d need to rally and regroup. It also allowed my infantry line to volley fire on his lancers and that caused a lot of damage. They pulled back to regroup, and lost 3 stands (from 6) as casualties doing so. My poor chevau-leger were broken and fled the field.

His dangerous lancers checked, next came his Hussars, Chasseurs just behind. His Hussar refused the order to charge as they entered a cornfield, only for my own to also refuse… we both used commander re-rolls here (commanders have a few for the battle), but both wasted them with repeat failures. When, later, his Hussars did respond to the charge! order, they rolled double 1 for the distance covered and didn’t make it across the field! Very half-hearted. My own Hussars, usually stalwarts of my army, again refused to charge and the two units were just not responding as needed! Vagaries of war…

His reserve Dragoon brigade arrived in column of march in the centre as his infantry columns slowly moved up, behind the cavalry action, my skirmishers still harassing them, but not stopping them. He claimed his ‘Hold the Line’ objective (no enemy units in your deployment zone when your reserves arrive), I could not claim mine (reserve infantry not here yet). Finally, his Hussars charged, and mine responded with a counter-charge, aided by my supporting chevau-leger. This turned out to be the crucial melee of the battle. It was very close, an even fight on the dice, but he rolled well and won it - drat!. My Hussars broke and the chevau-leger broke with them… my light cavalry brigade was gone and the centre was wide open.

So, with nothing in their way, the French light cavalry pressed on for my table edge, taking skirmisher fire and some cannon fire, but they were able to move off my table edge. This allowed him to claim a ‘Break through Enemy Lines’ objective (2 units moved off the enemy table edge). The victory points earned for this broke the Austrians. The centre was gone, the French cavalry was through and his infantry were moving in behind. My reserves had been too slow and could not fill the breach, so Hassalbach must be abandoned. My army withdrew.

A decisive French victory… won by his light cavalry’s swift move and aggression and due to my weak centre. My mistake in deployment, I should have placed my infantry there and left the cavalry in reserve instead. 20-20 hindsight. The French are now ahead on campaign VPs, but after resolving the campaign events, losses, unit experience etc. the Austrians did not sued for peace –so the war goes on. Game 4 will be another large battle, 5 brigades aside again. Von Klopp needs to put that setback behind him and do something about countering that French cavalry that is running a-mock. A new plan, fight fire with fire, and paint up my Uhlan regiment (quick)…

A heavy loss, but good fun… damn that little French-man… but this isn’t over yet! 

French deployment, left, opposite the village, and centre, pushed forwards to attack the cornfields from the hill.

French right, his light cavalry in swift columns of march, with limbered light guns.

Opposite, my entrenched infantry line, they would stand firm.

Austrian light a cavalry in the centre, deployed into woods, to hide...
Austrian right holds Hassalbach village, the feldjaeger battalion is led by a 'commander of note'... although little action for them today beyond some French incoming...

Single Austrian horse battery gun, soon to withdraw, given the force coming straight at them.

French light cavalry on the attack through the centre's cornfields, scene of the decisive melee of the game. My Hussars have already taken cannon fire from the hill (dice shows disruption on the unit).

Line lancers are flailed by musket fire from skirmishers and the line, and must withdraw in Disorder (not a neat line anymore). 


Hussar vs Hussar... and his won it... mine fled and turned the battle. Even if they'd won, they still had the Chasseurs behind to stop. The spirit of Lasalle lives on with these Frenchmen...

Monday 19 July 2021

THE ROAD TO THALA, - BATTLEGROUP: TORCH AAR


A 500 point Battlegroup: Torch game, with the British defending in a ‘Defence Line’ scenario, as 10th Panzer push up the road out of the Kasserine Pass towards Thala. My Brits had to stop/delay the Germans as extra forces and artillery (lots of artillery) moved into Thala behind them.

My force was selected as 500 points from the British Infantry Division ’43 lists, with one minor tweak  I could take individual Crusader tanks as the 17/21 Lancers were operating mixed Valentine/Crusader platoons at the time… weird, and not that effective I think, mixing the light, fast cruisers with the slow infantry tanks. Still, ammo was at least standardised as little 2 pdr shells.

Here was my picked force:

‘True Grit’
Infantry Platoon
+Vickers HMG team

Valentine Platoon
+ 1 Crusader

FOO in Bren Carrier
Battery of 2 25 pdr guns with loader teams and quad tows

Humber armoured car
Infantry foot patrol

Supply Truck

Portee’d 2 pdr AT gun on medium truck

1 Timed 25 pdr barrage (for turn 5)

1 Sangar (for the Vickers HMG)
2 Minefields

BR: 33+3=36, 2 Officers, 2 Scouts

The Panzer Force was (roughly):

FHQ in Pz IIIF

Panzer Grenadier Platoon (veteran) in trucks
+ 80 mm mortar team
+ HMG team

Pz IIIL Platoon

Battery of 2 x 80mm mortars (off-table)
Battery of 2 x 120mm mortars (off-table)

SdKfz 222 armoured car
Armoured recce team in SdKfz 250/1

37mm Flak gun with SdKfz 11 tow

BR: 37, 3 Officers, 2 Scouts


Having placed objectives, one on Point 31 and 1 on the road, the Brits deployed their defences and extra units into the central third of the table, ready to hang-on until turn 5 and the reserves arrived in the form of my 25 pdr battery and the tanks. Until then I had 2 AT shots on the table, the Humber’s Besa and the 2” mortar - so both barely count (but can pin)!

I used the 2 minefield to narrow the table and force him up the centre, along the road, to where I hoped to place my tanks to meet him. The 25 pdr battery was to deploy and lurk behind a hill and use IDF, but after generating the terrain, that wasn’t going to work, with no useful hill to hide behind. So they would be used for emergency direct fire instead, covering the road. The timed strike would impact directly between the minefields, hopefully as the tanks moved through.

The infantry screen would fight and fallback as best they could, onto the arriving tank support. The Vickers MG, on Pt 31 in its rock sanger would cover them and pin anything it could moving on the road, the olive grove and/or shepherd’s hut.

The Germans arrived with their recce 222 and 250 and one Pz III, it crept slowly up the road, and my ambush fire from the 2” mortar pinned it! Woo-hoo… first shot of the game.

The 222 moved through the olive grove and got into place to get on the radio to mortar point 31. I was mostly on ambush fire, waiting the storm.

Turn 2, and the the mortaring started, well 80mm anyway, 120’s had radio issues. No problem, my boys weather it with just a pinned 2” mortar team. The Pz III moved up again and the Humber opened fire, Besa-ing away with everything he had and hit! Needing 11s for any AP effect, the rolled - 12! The Humber bagged the lead Pz III - that never happens! First tank kill for the day to the Derbyshire Yeomanry! More German mortaring pinned the Vickers team int their heavily shelled sangar.

Now the German reinforcements rolled in. Well, 1 of them… a truck with infantry and the HMG team. They de-bussed and ran up the slope, left, for the Shepherd’s Hut on high ground. Inaccurate long range rifle fire from me didn’t stop them.

The Germans slow advance continued on turn 4, with 1 more reinforcement, more truck-mounted panzer grenadiers, this time heading through the olive grove to be pinned behind the wall of the goat-paddock by my waiting riflemen. They lost their supporting 2” mortar to another mortar hit… first British losses.

My screening infantry had done well, but under heavy mortar fire it was time to pullback, except one section (No. 2) was pinned by German MG fire and couldn’t. Problem, they were still in the timed 25 pdr strike’s danger zone.

Turn 5 and my first reserves arrived, the 25 pdr battery, to get set-up and start the dish-out the hurt in HE and, if they got the lines of sight, AP shells. No Panzers to target as yet though. My timed barrage landed and, due to the failure to actually arrive, not many Germans were around, bit of pinned was it, and some unhappy British infantry, lightly shelled by their own side!

Things started to heat up… the Panzers now arrived and pushed forwards behind the curtain of mortar fire, my Vickers team still in the thick of it. My 25 pdrs opened up HE suppressing fire down the road, that got his mortar spotters’ (he had 4 of them!) attention. My FOO, useless here, got in his Carrier and raced off back up the road for Thala, wise men, and saving the lost counters for random mortar hits.

The battle was fully engaged now, all my tanks rolled on, with his in the centre on the road, 2 of mine went up the left, over the hill, led by the Crusader (of course, far faster) and with the last infantry section in support. Two Valentines were on the right, trading fire at range with the Pz IIIs.  Both sides hits glanced off… interesting one this, better gun vs better armour, pop-gun vs thinner armour… very even.

We were in the thick of the action now, as his 120mm mortars shifted fire onto my 25 pdr battery, but failed comms tests or a few big deviations meant my guns survived the next few turns, hammering his infantry in the rocks and at the shepherd’s hut for much pinning. I lost the Crusader pinned by a Pz III hit, the crew abandon it… and the Vickers team had now broken, Point 31’s objective was advanced on and taken by his armoured recce team and some grenadiers. On counters taken it was even, I maybe had an edge, but the unpinning from the mortaring had cost me dear. When his HQ Pz III rolled up to the high ground to join the tank fight, a 25 pdr AP shell at long range tore threw it. 2 counters would but me ahead, except the counters were an Air Strike and a Breakdown.. so zippo for that! The breakdown was played on my portee’d gun, but rolled a 1, so it was still clanking along. The Air Strike rolled another 1, so no Luftwaffe, thankfully. The Stuka model remained on the self at the side.

On my far left the Valentine, slowly moving up to get side shots at the 2 Pz IIIs by the road  was the victim of a Mine Strike counter…unlucky. But a Valentine did KO a Pz III when a hit caused the crew to bail, he only had 1 tank left now. My 25 pdrs were repeated pinned, by mortaring and then long range heavy MG fire from the rocks by the shepherd’s hut. My rifle fire, suppressing fire of course, wasn’t doing much back, but the Valentine’s co-axial MG did get some German infantry’s heads down.

So close, at about turn 10, with the portee pinned and both 25 pdrs as well, I had to unpin, but with only 3 B left it was risk. I might get away with it. I drew a 4.., damn, broken. Time to pullback up the road to Thala. 10th Panzer would not be far behind…

Great fun, a close game, although the Germans counter pulls were pretty good… 3 special counters was a big aid to him, but it could have gone either way. Nice to play my first game with (borrowed) Valentines… nice tank (waz gun). Really liking our Tunisia games, lots of variety, different forces, odd tanks, desert with actual terrain… way better than Normandy hedges imho.

Action on the Thala road…


Foot patrol, and 2" mortar team (on ambush) hide behind the wall of the goat paddock..the rumble of Maybach engines approaches....

222, mainly in a mortar spotter role today, arrives through the olive grove. Behind the first grenadier's transport.

Humber's Besa takes aim at the first Pz III and rolls to penetrate...

Bagged one!

222's gets the mortars firing. 2" mortar lost.

Panzer grenadiers take the shepherd's hut, under rifle fire from the rocks down the hill.

German infantry reach the goat paddock and take cover from ambush rifle and Bren fire.

The shepherd's hut provide cover as the infantry prepare to jump off their attack. Delivery trucks now withdrawn to safety.
Thala road from my end as the Germans roll in, slowly.


Crusader from reserve and infantry, moving on on my left.

Along with the 25 pdr battery to cover the road.


Quickly deployed and on ambush fire. Loader teams in place (limbers facing the wrong way you fools!).

Forward HQ rolls up, and gets pinned by 25 pdr fire.


Mortaring and a Pz III hit cause the Crusader crew to bail and run. Infantry in full retreat beyond.

Enemy armour by the road, German infantry have moved up to the rocks, the Brits having broken here.

Last to arrive, the flak support on tow through the goat paddock. It set-up, fired once, then ran out of ammo on a special counter.


Portee'd 2 pdr aids the tank fight, pop-up attacks from the reverse slope. It survived a breakdown counter(too much reversing everywhere!).

Valentine hits a mine and is left smoking...

Pz Grenadiers take Point 31, and are pinned down by my rifle fire. Still, they have an objective.

Another panzer crew bail-out under accurate British 2 and 25 pdr fire.


Valentine dukes it out up the Thala road... low on ammo now though.

Heavy 120mm mortar finds its target... no direct hits though (quad took a hit earlier), but pinned down now. Must unpin...

My counter pulls... all the 4s!

German counter pulls... 3 1s... they showed the true grit today.

Tuesday 13 July 2021

Soldiers of Napoleon - Schumann Farm, near Plauen, Battle of Dresden, August 26th, 1813

Game 2 of mini-campaign was a big one, a good test for the game at it’s maximum size (for general play). 5 brigades a-sides. 3 deployed, 2 in reserve.

The French deployed occupying the Schumann Farm with a strong infantry brigade, reinforced with extra 8 pdr guns at the farm itself. In the centre, around the farm’s fishery pond was his Dragoon brigade, 3 Dragoon regiments (if each weakish) and their horse battery. The French right was another infantry brigade. Behind, in reserve, ready to move up, were a light cavalry brigade (this played no part in the battle in the end) and a Cuirassier brigade of 2 regiments, his heavies. So, a cavalry heavy force for the French who unsurprisingly elected for an all out attack… they were coming!

For my Austrians, I also chose an all out attack, so this was going to be a furious clash. My plan was to await for my reserves brigades, the cuirassiers and the grenadiers before launching the attack though (made that mistake before). My two infantry brigades would hold, form squares if necessary, and I deployed my light cavalry as a screen to the left, their job to go forwards and disrupt and harry the French whilst I waited for the big-hitters to arrive, both brigades due at the end of turn 3 it turned out.

All the units on the tabletop, we dealt the first action cards and the French, with the Initiative, had first play… his first card being for a special event ‘Senior Officer Arrives’ and rolling for it, General St Cyr trotted up to take a look over the field here, which would prove useful for getting his reserve in quicker and give him an extra Action card each turn whilst the Corps’ commander was on the scene.

The French began aggressively, the Dragoons galloping forwards in the centre, countered by my light cavalry, with my chevau-leger getting in the first charge and just driving off one regiment, then my Hussars, always in the thick of it it seems, driving off another, nice early work by the cavalry screen. His guns open up with their usual accuracy and blasted holes in my ranks, especially opposite the farm. My own guns where still on limbers, as I intended to come forwards a bit first (for range). His 8 pdrs had the reach which my 6 pdrs didn’t. The French artillery would continue to be a potent force throughout, which I couldn’t match.

The French also set-off with an infantry assault, 3 battalions, through the Schumann orchards towards my lines on the far right. My skirmishers and jaegers opened fire as they moved through the trees, but didn’t stop them.

In the centre the cavalry dueling continued, between the lines, his Dragoons regrouping and his horse guns blasting my light horsemen. I pulled back, but his cavalry came after me. One Dragoon regiment wheeled away left, heading into the gap at speed and before I could change formation, they charged headlong into my Linz landwehr, destroying them utterly. Next, they hit my line infantry, who also took a beating, falling back, then breaking. The Dragoons were on the rampage as I urgently send 1 chevau-leger regiment after them, galloping right to the aid of the infantry. After the first 2 turns the French had a narrow lead and, with St Cyr’s aid, his reserve cavalry arrived on his table edge. Here he held them, waiting their moment.

The French infantry assault on my right had stalled at the edge of the orchard, under musket and now artillery fire, all 3 battalion columns refused to charge home (2 were only reservists, not great at this attacking lark). They returned fire instead, but were out-shot at the moment.

Meanwhile, my Hussars had got carried away, my fault, and seen a chance to rush his deployed horse battery, they boldly charged and didn’t make it, leaving them open to a horrid, close-quarters canister fire experience, with heavy losses. His regrouped Dragoons moved in the for the kill and I couldn’t get away in time, my Hussars were being cut down and soon ragged ordered, before breaking - a terrible waste of good cavalry and a mistake by me. I got greedy for the glory (and VPs, very Hussar-like).

End of turn 3 and the French had pulled further ahead on VPs. His cannons were still hurting me, I’d lost a battery to those damn rampaging Dragoons, but they had now lost some men themselves and, reduced in strength, were less of a threat. My Cuirassiers arrived from reserve, on my right, but the grenadiers didn’t show up… damn them. I’d have to wait and try again at the end of turn 4. I need those troops.

This battle was slipping away and I hadn’t got my attack going yet. No time to waste, rather than wait for the grenadiers to join them, the heavy horse galloped forwards at top speed, deploying into attack columns from their columns of march. Seeing them coming, French infantry formed square ahead of them, their guns targeted them, but the brave men of the 1st and 3rd Cuirassiers rode on! His last Dragoons were badly outnumbered and outclassed.

On the right, my infantry volley kept the French at bay, until one battalion finally got enough courage up to press forwards and charged home, their attack column easily driving my firing line back. But the reservist with them were panicking (special event) and did not help, one unit just fell apart and routed. I thought could hold here, and my grenadiers would counter-attack and sweep these Frenchmen away, winning the day.

Except more artillery fire, some from off-table, was hitting my lines and I lost 1 infantry battalion broken by it… another blow. The French were on 30 VPs, needing 37 to break my army. I was at 19, needing 38 to break him… not good odds. It was all or nothing for the Cuirassiers’ attack. In they went, one regiment’s charge swept away his Dragoons in a one sided fight and they broke. The Cuirassiers raced on to overrun his horse battery as well. The others, using a special ‘fierce cavalry charge’ event., plunged at one of his squares and almost broke it (1 more point of Disruption needed). But, despite the carnage, the French square held and my cavalry pulled back. They regrouped though and prepared to try again. Only now, with the Austrian heavy horse in full cry did the French commander react with his own, the Cuirassiers came cantering forwards to counter my attack in the centre, using a ‘well-drilled’ special event to swinging from march column in attack columns, wheeling around the pond. Still, it was a bit late, he might have waited too long.

My grenadiers had arrived, marching in and pushing forwards towards the Schumann farm, one battalion forming line and cutting those last Dragoons to shreds with several volleys. The brigade’s supporting battery deployed and sent accurate shells into the advancing Cuirassiers. It had been bad turn for the French, he’d lost 1 infantry battalion, 2 Dragoon regiments and a horse battery. I had lost, err, nothing! Suddenly, the Austrians were just ahead on VPs. It was very close.

The final turn and finally French gunnery deserted them. His guns did little damage. My regrouped and rallied Cuirassiers charged again, taking a gun battery and cutting down his gunners (they had their chance and blew it). His infantry fire, most in squares, was ineffective. My other Cuirassiers withdrew before the powerful re-post of his cavalry, avoiding being counter-charged. And, just like that, the French broke… signalling the retreat as my VP total reached 39, to his 35. I had won, by 2 just 2 VPs. The Cuirassier’s bold attacks had won the day at Schumann Farm.

The game had lasted 5 hours, long, but I aim for 1 hour per brigade and it was bob-on for that, and this was a big game. Somehow the French had thrown away their lead. His gunnery desert him at the end, but had been well above averagely good earlier on. Perhaps he just needed his reserve cavalry up sooner. But, it seemed the forces he had would win without them, so he didn’t send the order to get moving. Me, I had scraped it. My light cavalry had been badly mauled, lost my Hussars stupidly when they had done their job and should have withdrawn. My infantry held up long enough, although Krawietz’ brigade had taken bad losses, mostly to the Dragoon-rampage. Great fun. The game’s action is creating that nice narrative, it feels like a Napoleonic battle, with eps and flows. It looked great on the tabletop, busy but doesn't feel too full. On to game 3 for the campaign, with the Austrians just in the lead now.

Some pictures of the hours of battle across Schumann’s fields. 

Kraweitz' infantry brigade deploy on my right, on the hill, von Klopp in the foreground waves them on. The dice shows his command re-rolls for the game.

French guns, with full caissons, deployed at Schumann's farm.

Grujik light cavalry brigade out front on my left/centre.

French infantry columns are harassed by skirmishers in the orchard hedges as they advance on the French extreme left.

The cavalry advance to met each other in the centre of the field. A honourable duel to begin.

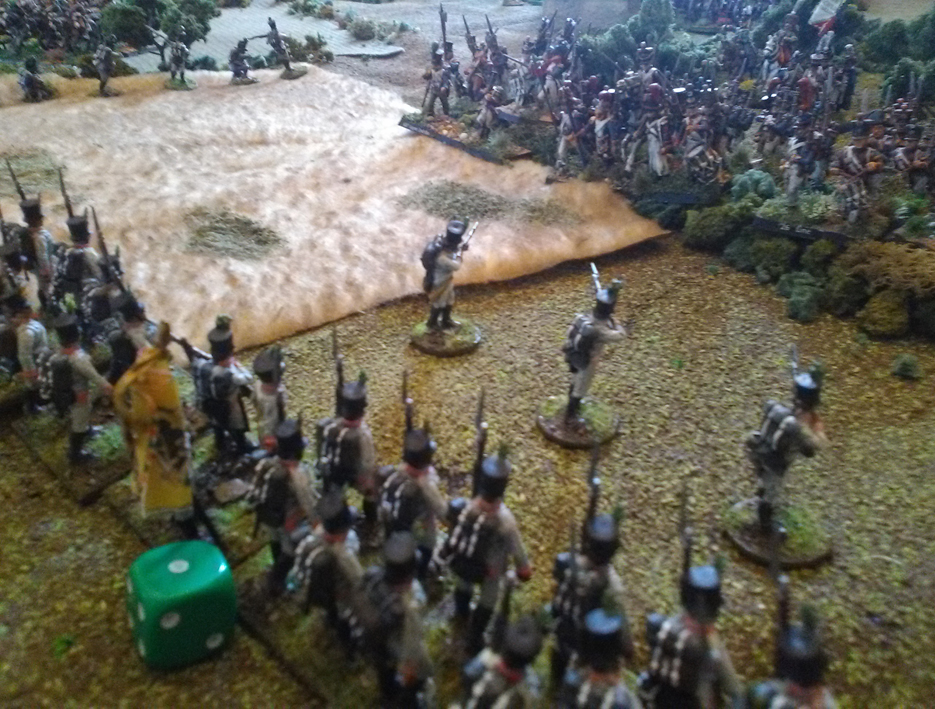
Schumann's fields, Austrian infantry awaiting the order to attack as the light cavalry do the dirty work ahead. 

Dragoons stream forwards in a fast column of march, risky with Austrian cavalry close by. They quickly changed formation.

So fast it's all blurry... the 5th Hussars target his Dragoons, charge and win. 


In line, Austrian infantry and skirmishers engage the French columns as they reach the orchard hedge. Musket volleys crackle back and forth.

Dragoons on the rampage, they rush into the gap, only skirmish fire from the jaegers to stop them (it didn't).

My heavies thunder onto the field and rush across the table, forming into attack columns. Not as good as a line for impact, but easier to manoeuvre. Kornmayer's brigade command stand is between his regiments.


The French get through the hedge, but the reservist were not happy and refused to press on, eventually panicking and breaking. 

Austrian cavalry in full cry, trying to break the French square. No easy task, at which they just failed. The cannon battery's canister would be a painful reward for the failure. But they pulled back, regrouped and went again. Bravest of boys today.

French columns, ragged now, press from the orchard. Only one made it, but broke the Austrian line at bayonet point.

Advance the grenadiers, the full brigade arrives along with its supporting battery on limber.

Hungarian grenadiers hammer the last Dragoons into a bloody mess with repeated volleys, breaking them.

The French heavies advance past the farm and pond, under heavy cannon fire though, but too late to intervene.

1st Cuirassiers (in some disorder now) crash the French line again and smash through... the decisive action of the battle, they overrun the guns as the French break. Note, that square is still in place in the foreground. It is very hard to break one...


Note: Large green dice show Disruption on a unit, we had small ones, but found them fiddle and too hard to see 'in game'. Disruption is damage, disorder, fatigue, etc. As with other 'Soldiers of' rules, more Disruption than stands at the end of a turn and a unit breaks, Disruption is lost via Rally actions, but Rally actions can cost Victory Points to the enemy, so Rallying is an attrition on your army.