Saturday 27 May 2023

Battlegroup Torch, Operation Vulcan begins, Attack on Point 137

A historical scenario as the British push for Tunis at the end of the North African campaign. Here, at a farm called Sidi Salah on the Tunis road, the West Kents supported by Churchill tanks had the task of clearing troops of the Hermann Goering division off a ridge line (high point Point 137) that overlooked the road and stopped it being used. They had to cross open fields which the Germans had heavily mined and clear them off the rocky high ground into which the Germans had dug-in. The attack as led by Churchill tanks, and ran into Tiger tanks supporting the defenders, resulting in a very tough struggle as they cleared gaps in the mines (Matilda Scorpions were to be used but, interesting fact, they weren’t because as a secret weapon, they were ordered not to be used in daylight and be seen by the enemy). The job came down to engineers with minesweepers.

As the defender, I set-up first, dug-in infantry platoons, one forward on the low lying ground, covering the minefield and slowing the advance. On the ridge, my dug-in PAK-38 (bit pants!), more infantry, 80mm mortar spotters and two sMG-42 dug-outs, which I placed on either extreme, ready on ambush fire, and these would do the heavy lifting in keeping his infantry back. The two Tigers and their supporting Pz-III N were in reserve.

The Brits started the game on Turn 1, moving onto the table with the tanks and a single carrier, out of which hopped a small 2-man team to the front of an orchard. With 4.5” and 25 pdr batteries to hammer the ridge, that was most likely a forward observer team. My sMG-42 sprayed that orchard with long range fire, pinned the team, which also lost a man and the last man standing was removed… instant win, first dice roll of the game as the spotter went down and was carried away by his radio-op. Respite from British guns.

The Churchills rolled in, and used their BESA fire to try and pin down the forward screening teams, in their foxholes, to little result. But my screen had no AT weapons, so would be waiting on ambush until the those Churchs got within 10” to try and pin them, somehow, on 6s! Behind, the rest of the Germans go on ambush fire and waited.

The Brits continued to roll in, an infantry platoon of the West Kents (Tunbridge Well’s finest) on foot, and provoked some long range MG fire that did nought. Over the following turns the Brits would roll in at 2D6 units per turn until all in, with extra platoons of West Kents and some Blackwatch. More importantly, the FHQ arrived and jumped from his jeep to take up control of the 4.5” gun battery, that started to hit the ridge, doing some pinning (and 1 direct hit on an MG teams foxhole that marmalised them all). I was waiting until Turn 4 to get my good 88mm anti-tank guns to have a crack at those Churchs, until then, trying to pin them, or the occasional 80mm mortar direct hit was doing little but scratch paintwork.

The Church’s slow advance, still Beas-ing away (the verb ‘to Besa’ - fire both machine guns on a Churchill tank repeatedly), continued, as the engineers on their engine decks jumped down to deal with the two minefields in the centre, around the low rocky hillock I was trying to deny the Brits. At this point, the Germans had a turn of luck, i.e., not many orders and then did nothing, not a hit, not a pin, nothing for an entire turn, which they then repeated in the next turn, a complete whiff – twice! Still, at least the Tigers (and Pz IIIN) had arrived, they could turn it around.  

The Brits cleared those minefields and could move infantry of the West Kents into the rocks, from where they returned fire up the ridge with those big firing teams. More 4.5” artillery landed, adding some pinning. In a little counter-attack on the right (my) orchard I sent a rifle team to rush a Churchill with their AT grenades. It failed, seeing one man cut down, then trying again and seeing 2 more men cut down, leaving the squad pinned and then wiped out by Besa fire… drat! Oh well, suicidal tactics gets expected result!  My PaK-38 continued to be rubbish, failing to get any pins, and its loader team never helped, all game - useless. The Tigers moved up onto the ridge, both together to try and overwhelm the Churchs on his right with twin shooting. First they had to hit - no dice!

The tank fight began, the Churchs scored a pin on one of the Tigers, whilst the Pz III’s HE managed a pin against a Churchill too (handy). Tiger 88 fired scored a hit, and glanced off - good grief! Both sides had a lot of pinned troops, the Brits taking 2 chits to unpin for a few turns, the luxury. My front screen of infantry had now been whittled away, so it was time for the Brits last push for the ridge. The 4.5” guns continued their work, whilst I struggled to get my mortars to reply with more bad dice on comms tests. The Church’s fusillade of fire, HE and AP at the Tigers added to it, and pinned the other Tiger. Only one was ever in action, and it finally hit and KO’d the first lost tank of the game (in about Turn 8). My MG teams were keeping the West Kents heads down in the rocks well, and one engineer squad, pinned in the open, was mowed down.

The Brits pushed on, the first Church reaching the slope and using its excellent slope climbing ability to grind towards Points 137. My Pz III had run out of ammo and retreated back behind the ridge to find some more (my supply team was infantry with a hand cart, not sure you get many 75mm and 88mm shells in one). The Tiger, low on ammo, spoke again and got another kill, but then had to retreat too. I was not longer able to unpin, my break point was too close. So this left one Tiger stuck. In the next turn, when heavy British Vickers and Bren fire killed a machine gun team, the chit draw broke me. End of game.

Tunbridge Well’s finest had won the day and driven the Hermann Goering Division off Point 137. They had 9 BR left, so close, but not close enough. A long game, but great fun. Man, my dice just deserted me for a few turns, and well, the Tigers claimed 2 kills, but I think I needed more from the big hitters to turn it around. Interestingly, it was this engagement, on this day, close to this Tunis road were Tiger 131 was captured intact (and ended up at Bovington tank Museum). The Churchills are one claimant to having got it. Gotta say, Churchills are ace… very good British tank design. One of them might have had my grandfather in it.  

Thanks to Ken for writing the scenario, nice to play a historical refight I didn’t write for once. Both had some good luck and bad, both pulled aircraft counters and got no shows… loving Tunis as a theatre for gaming. 

The rocky ridge and Point 137

The battlefield, Brits attacking from the top. Germans deployed on the ridge and just below it.

HG dug-in on the high ground.

And the low ground, just behind the mine fields in the centre.

FHQ at the rear of the ridge, along with wire team.

Churchills roll on, as first mortar rounds land, they care not...

Past Sidi Salah, carrying engineers as tank riders.

View from the Pak's dug-out, many targets, none hit.

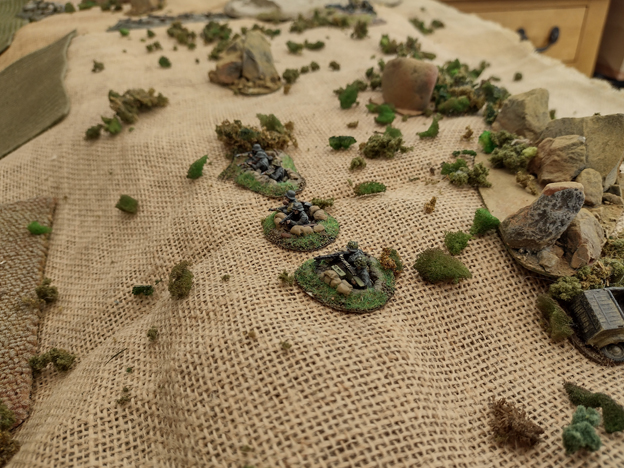
sMG-42 dug-out, sweeping those fields and any sneaky approach via the farm and its paddocks.

Churchs close on the rocks, which are mined. Mortar fire doing zippo.

Engineers pile off and rush to clear the way.

Panzer III N, not much use in a tank fight. Used all its HE quickly and pulled back.

Tiger climbs the rear slope. Things about the get interesting for the Churchills.

Pinned by a 6 pdr AP round that glanced off the Krupp steel.

The other flank, no Tigers to worry about here, just infantry to BESA.

4.5" shelling pounds the ridge, turn after turn.

The tank duel, can I score a hit - yes. Can I score a kill-  no. 

The West Kenst are in the rocks in force and hammering away up the slope with Brens and behind, a lurking Vickers team.

Boom, clang, pinned Church, rocked by an 88mm round. Tough old buggers these tanks.

Out of ammo, the resupply team can maybe help.

Off to find the same team, nice to have a ridge between you and enemy to move behind.

At last, kaboom! First Churchill explodes from an 88 hit.

The others close in though, note the largely empty defences now.

Up the slope, rare Churchill I, as the HG Division fall back off the ridge, too hot up there now. Mission complete for the boys from Tunbridge Wells and Sevenoaks!


Friday 26 May 2023

Third Assault on Aderklaa @ Wagram, scenario 6 with Soldiers of Napoleon

The sixth game of our Wagram campaign, and the French’s third assault on Aderklaa, the last at this village I think. This time Morand’s division launch the assault to drive out the last Austrians, mostly grenadiers and infantry, with neither side with any cavalry support at all this time. So, a big infantry brawl.

The game started (same battlefield as last time) with the French assault moving up, the German troops in the centre. Learning from last time, I decided not to offer the same resistance up front with my weakened grenadiers this time, battered and with fewer stands, the grenadiers would hold back and maybe launch a counter-attack, but I would try hard not to lose them (and the game) this time.

On my right, the fresh grenadier brigade would launch a counter attack, and they started in march columns, for a swift advance, then into line or assault columns to drive into the French. Hopefully, their good resolve and musket and melee would see them give the French line infantry a bloody nose. I’d also attack on the left, my own line infantry, pushing up to divert troops from the village and threatened his weaker right, although there were a lot of French and Saxon batteries to face. They would do hellish damage for 2 turns, until ammo low events slowed them down a bit.

In the centre, the German allies were soon in the first buildings, and claiming the objective, a good start, but my grenadiers were mostly unscathed this time and could counter-attack. French guns started brilliantly (helped by all three intense cannonade cards) and the Austrians were feeling the pain, one battalion breaking under the accurate fire. The French leapt out to an early lead in VPs as the Austrians were still moving up.

With just skirmish fire in the village, both sides wary of pressing the other (it was too close to call really), the Austrian’s right grenadiers used a timely ‘well-drilled’ card to march up and deploy into firing lines, knowing a withering volley card was hand. The French suspected it too, but there was little they could do about it, as the grenadiers got another play and immediately unleashed a hellish volley that saw two French battalions badly damaged. One grenadier battalion also charged and drove off another French battalion in melee, the fightback was on. The French were forced to rally, battalions ragged after losses now. On the right my infantry pressed on, the cannon fire slackening thankfully, but now the infantry fight was on, skirmish fire, then a few volleys started to add to the carnage. I had saved a card until last, the second withering volley! Ouch! My grenadiers poured the fire in again and as the smoke cleared 3 French battalions had been broken, fleeing in a turn that saw the French left brigade shattered with just 1 battalion left facing 3 grenadier ones with their dander-up. That flank was in big trouble. Next turn and I could press my advantage here, the Austrians were now in the lead on VPs, but the French knew they needed a win in the centre or on their right to pull it back. A furious turn of charges, volleys, counter-charges followed, and one Austrian line battalion broke under German bayonets, but as they did, so did the final battalion of the French left, leaving just an artillery battery of the entire brigade, under counter-battery fire from my artillery and on the verge of breaking too, having seen the columns gunned down by my grenadiers. We added up the VPs, the French had not quite done enough damage to salvage the battle, whilst they had broken, just, themselves. It was close though, just 1 VP left for the Austrians, but enough to score them a first marginal win of the campaign.

Great game, it really swung hard in turn 3, with carnage from my grenadiers, that did the business as my best infantry should (but rarely do). No cavalry to worry about was a fun twist, we both just get stuck in, not having to worry about cavalry attacks. Maybe the Austrian comeback has begun, as we go into game 7, leave Aderklaa behind, and head over to the French right with Davout’s Corps and his attack on, and around, Markgrafneuseidl. Let see if the Austrians can hold as well…  another infantry brawl (but no grenadiers). 

The field, over the Russbach stream from the Wagram slopes. Aderklaa and not much else.

The grenadier brigade arriving on the right, at the quick, hauling guns up to. Go, go, go... no time to waste.

The infantry on the Austrian left, beyond, burning Aderklaa.

French and Saxon gunners give the Austrians a good hammering to start with, until the ammo ran low. A lot of heavy work for the gunners.
The grenadiers arrive and with smooth precision deploy into two battalion lines, facing 4 French battalion columns, muskets leveled... wait, wait... fire!

Little action in the actual village, but the French have some houses, the Austrians loiter towards the rear and look for chance to counter attack.

After two withering volleys the French are reduced to 1 battalion left and in big trouble. My boys with the big hats would pour it on again next turn too... crushing the French left.

A few French/Germans hold out in Aderklaa, but under cannon and skirmish fire, its getting hot. They would pull back to rally, leaving the village in no-man's land. As on the day, neither side secured the village and it ended up between the lines. All that fighting for little result for either side.

Friday 12 May 2023

Second Assault on Aderklaa @ Wagram, scenario 5 with Soldiers of Napoleon

The fifth of our Wagram scenario series, as the French attack again at Aderklaa, mid-morning, with the rest of St Cyr’s division, including a big brigade of Hesse- Darmstadt infantry (looking suspiciously French) and with some Saxons (on their left). The Austrian defenders are the grenadiers holding the village itself, with infantry (lots of it) on the left and the cuirassiers still stationed on the right rear after the last time (but suitably reduced in numbers after their terrible losses in game 4).

With the French launching an all out assault, my plan was to hold firm in the centre for as long as possible and counter-attack on the left and right, infantry and cavalry. No sitting back, I’d go forward and get stuck in to aid the grenadiers who could hopefully be relied upon to hold on to the houses for long enough.

The field of battle, Aderklaa in the centre, Austrians will deploy on the left, French and allies to the right.


The French didn’t waste any time in moving up, the Germans racing up, four assault columns behind a screen of two fusilier battalions and the skirmishing fire began, which was bad for my ‘skirmish shirking’ grenadiers, the disruption quickly mounted on them. My infantry marched up and deployed their own skirmishers too, whilst the cuirassiers advanced but slowly, because for some reason I’d unthinkingly put them in a line instead of march column for speed, and so they trotted up, whilst taking French/German cannon fire, which forced me to rally them too, all far too slow from them. Oops, my bad!

In the centre, with my grenadiers under heavy pressure, two German columns charged through their screening fusiliers to press the assault, only to both be thrown back by tough old grenadiers invoking the power of big moustaches and bigger bayonets. Hurrah, but one battalion did then break. Still, I had another to feed in to the buildings and try to stop the French from claiming their ‘Take a Strongpoint’ objective. My infantry counter attack did well to start with, routing a Hessian fusilier battalion with musketry and a swift column charge… so far so good, losses on both sides, it was even(ish).

Then it turned, the French allies, having failed to break into the houses sat back and shot them up, and the repeated skirmish and volley fire, despite rally’s broke both my grenadier units, leaving the village empty and a simple advance claimed the first buildings, the mighty moustaches had failed me! A timely whither volley also smashed one of my infantry battalions to iddy-bits and my counter attack on the left was faltering and needed to rally too. The cuirassiers were still struggling to get forwards and didn’t want to face another withering volley, so I held them back. They charge next turn, but by then the French infantry on his left would no doubt quickly form square.

The French scored big in VPs and the Austrians were really up against it. My infantry on the left scored a few more musket hits but refused to counter-charge and get those buildings back. The French on their left, in line, didn’t form square in time and my cuirassiers gleefully charged home, and as the French line tried to run it was ridden down with total carnage, a gory massacre of the battalion from my heavy horse, doing their thing well… hurrah!… the second battalion quick did form square but then almost broke from intimidation anyway. They needed an emergency rally to avoid just running as well. It was all a turn too late though… because the Hesse-Darmstadt Lieb-Guard battalion had advanced clean through the village and emerged to jump my artillery battery by surprise, routing it and taking the guns as prizes. That was it for the poor Kaiserlichs… the French VPs reached 32 against my Break Point of 31 and the Austrians had lost (again - this is becoming repetitive). I had scored just 15 VPs from the French Break Point of 32, so it was a Decisive French win at Aderklaa. It is now 8-0 on battle victory points to the French, who are winning at Wagram unless I can mount a serious comeback, oh dear!

Tbf, a few mistakes by me and some timely cards from the French saved him, plus maximum VPs for the Strongpoint objective (again). My cuirassiers should have done more, and I could have saved the grenadiers with another rally and fallen back, but I didn’t want to let him have the buildings, so stayed and fought and thus exposed them to too much fire (then lost the buildings anyway). A fallback, regroup and counter-attack would have been better in the house-to-house fighting… lesson learnt, because losing 3 grenadier battalions and their guns really cost me the game. For the French (and Germans) it was well played, even if the Saxons did nothing all game, beyond a few long range cannonades. It also didn’t help than in Turn 1 two of my gun batteries were low on ammo, so my cannon fire was very weak throughout…  bring more powder and shot next time.

On to game 6 next, and the third Aderklaa assault (in reality St Cyr was pulled back by Massena after heavy losses and Molitor’s division took over the very hot fighting for the village, that’s the next scenario). Archduke Charles need a win badly. Damn these Frenchmen fight hard… 


Austrian right, the cuirassiers, but with a long way to travel to reach the French lines.

Austrian left, a lot of infantry, mostly in column for the counter-attack.

French attack columns on their left (with starting Disruption due to earlier fighting).

First French voltiguers investigate the village and open fire.


The centre, Hesse-Darmstadt allies will go in, screened by their fusilier battalions in extended line. Beyond are the white-coat Saxons (the lazy fellows).

A massive attack... six German battalions close in, facing just two in the buildings.


The assault breaks in to the village and takes the first houses, again... led by the Lieb-Guard battalion.


Austrian infantry counter-attack under way to the left of the village. Pressure on the French mounts.


At last, the cuirassiers arrive, crushing one battalion in a bloody rout and threatening the next, which must hastily form square and then almost runs anyway.

The enemy have Aderklaa... and the grenadier's command stand is in danger of being captured. He needs to get out of there... swarming with Germans...

Lesson learnt, the French are now in square, but face multiple intimidation checks, which almost break them anyway. A lot of wobbly knee'd Frenchmen...

They have cleared the village and control it, not much left for me to try and retake it.

The Austrian infantry counter attack as stalled, fought to standstill in heavy musketry, both sides with heavy losses, but a stalemate isn't good enough for the Austrians.

The Lieb-Guards' attack burst through the village and overrun the Austrian supporting cannon battery behind. All seems lost. All is lost!


Friday 5 May 2023

Fantasy Battle... Soldiers of "something"... a play-test.

A longer term plan is to write a fantasy battles version of Soldiers of God (or Soldiers of Rome), using the same basic rules and card-driven turn sequence, and have a set a rules I like for my old WFB armies. I have a large High Elf force, which I've added to with a few command stands, and a dark Elf army to match them, a classic WFB match-up of hated foes. I also have Daemons of Khorne, but not enough, so these are now summoned Dark Elf allies, using their vile, dark sorcery (and many sacrifices no doubt).

As with other Soldiers of, the armies had 3 'companies' a left, centre and right and these each had their own part in the battle plan. Here, by random choice, both commanders chose to attack on their right, holding on their left, with the Dark Elves supporting attack in the centre against the holding High Elves on their hill. 

The Dark Elf attack was powerful, led by their lord on his black wyvern, with heavy knights (riding lizards), demons, a giant hydra and fanatical witch elves... eek! Their infantry and crossbows were in the centre and left. The High Elves met this with a skirmishing left flank of light cavalry and rangers, all very good archers (Elves!), a solid centre of bolt throwers on the hill with spear-armed infantry to defend them and attacking elite infantry led by their lord on his griffon. Both also had a single sorcerer and a pool and spell dice to spend throughout the battle. 

As battle began, cards being played to March, Manoeuvre, Loose! and Charge! etc. as would be familiar to 'Soldiers of' players, it worked well, and the Dark Elf attack was taking a lot of hits from good Elven archery, but they rallied it off and the mighty hydra regenerated, so the attack still looked strong as it closed in. A characterful 'impetuous charge' special event saw the witch elves rush in before the knights could charge, thwarting them, but the witch elves still cut down the Elven infantry in a bloodbath. Meanwhile, the demons were waning in power fast (their Resolve drops each turn) and struggling... targetted by bolt thowers one unit was routed (well, banished back to the spirit plane). 

Magic had its effect, the Dark Elf sorceress using most of her spell dice to summon a greater demon, and sending it off to attack the hill. As it was about to charge, the Elven sorcerer did likewise and countered it with a summoned dragon (I'm going to change this to a Phoenix I think, and get a model). These two mighty beast fought it out for several turns, before killing each other in a stalemate. 

Hero the day was the Elven Prince on his griffon, who swooped in to rout the hunting hounds(not biggy for them, cheap expendable troops) and then targeted the war alter which was drawing in more magical power for the sorceress. His attack against its guardians and priestess was another prolonged fight, but when he won it, slaying the evil priestess, the battle was won for the forces of light... a solid High Elf victory...

That scratched an old Warhammer itch, and moved the rule's development along a bit, with a new magic system I really enjoyed and some revised stats of the monsters and how they work, including special events that allow them to rampage about and make 'death blow' mega-attacks against other monsters (Godzilla style). Flying things, as always are a pain and very powerful... need to up the points for flying... all still very much WIP.


Pre-deployment, random terrain generation: a hill, 3 rocks (1 was the magical menhir) and a small wood, that is it.

The Dark Elves have come to tap the magical power of the menhir, and use it to summon more demons to their aid.

The Dark Elf left, their main strike force ready to charge.

Facing them, the light-weight left right. Horse archers, rangers (all excellent archers) and solid infantry.

In the centre, on the hill, the bolt throwers and more infantry (which will move to clear the line of sight)
Dark Elf battle lines, their leader aloft on his wyvern, to lead right flank attack. 


Prince Ithilmar and his griffon make mince-meat of the hunting hounds sent out to harry the bolt throwers. The first casualties of the day are the hounds, no match for an enraged griffon


The Dark Elf lord is soon countered by the two giant eagles which swoop in to begin a protracted fight with the wyvern, high above the battle below. In the end, the eagles brought him down.

The evil attack closes in, as the Elven light horse pepper them with arrows and retreat.


The Dark Elf left, crossbows and the war alter of bloody carnage... a fearsome magical artifact drawing more magical power to it.

Enemy approaching as the light cavalry seek shelter behind the infantry. They have fallen back as far as they can go. They must stand and fight now.


The bold Elven hero charges on his griffon, overcoming the altar's terror to try and destroy it.

Demons charge in and hack down the Elven cavalry, with each passing turn their power is waning.  The Dark Elf attack does damage as the infantry are also routed, but not quickly enough... 

The Dark Elf sorcerers spent all her power to summon a great demon to her bidding, and it flew in to attack the elven centre from behind, only to be denied its prize by the Elves sorcerer summoning a dragon! An epic fight resulted as both summoned creatures tore into each other, and both died in the struggle. Not sure on the dragon, might be too much. I'm going to change it to a Phoenix, which seems more characterful, big burning bird.