A one-off pick-up game, set at 800 points and Corps-level (so 4 brigades a-side, 3 deployed, 1 in reserve) using the 1813 army lists as my Austrians once again took on Bony’s boys in blue. The plan is run a slightly larger game at the Other Partizan in October, so we had a trail game for that (and just a afternoon’s entertainment).
Here is the force I picked.
Austrians 1813
Infantry Brigade 1 (rear right)
Fusiliers 6 stands 60 pts 1MV
Fusiliers 6 stands 60 pts 1MV
Fusiliers 6 stands 60 pts 1MV
Landwehr 3 stands 15 pts 1MV
Landwehr 3 stands 15 pts 1MV
Artillery battery 2 6 pdrs 18 pts 2MV
Jaeger Detachments 2 12 pts 0MV
Total 240 pts 7MV
Infantry Brigade 2 (rear left)
Fusiliers 6 stands 60 pts 1MV
Fusiliers 6 stands 60 pts 1MV
Fusiliers 6 stands 60 pts 1MV
Landwehr 3 stands 15 pts 1MV
Landwehr 3 stands 15 pts 1MV
Artillery battery 2 6 pdrs 18 pts 2MV
Artillery battery 2 12 pdr 28 pts 2MV
Jaeger Detachments 2 12 pts 0MV
Total 268 pts 9MV
Light Cavalry Brigade (screening left)
Hussars 5 stands 75 pts 2MV
Uhlan 5 stands 60 pts 2MV
Artillery battery 2 6 pdrs 18 pts 2MV
Total 153 pts 6MV
Reserve Grenadier Brigade (in centre on turn 3)
Grenadiers 5 stands 70 pts 2MV
Grenadiers 5 stands 70 pts 2MV
Total 140 pts 4MV
Grand Total: 800 pts, 26 MV, 2 scouts.
And here are the enemy:
French 1813
Stalwart General +5 pts
Infantry Brigade 1 (on right)
Reserve Infantry 6 stands 30 pts 1MV
Reserve Infantry 6 stands 30 pts 1MV + Drillmaster
Line Infantry 6 stands 66 pts 1MV
Line Infantry 6 stands 66 pts 1MV
Veteran Infantry 4 stands 68 pts 2MV + Ruthless commander
Artillery Battery 2 8 pdrs 24 pts 2MV
Total 294 pts 8MV
Infantry Brigade 2 (on left)
Reserve Infantry 6 stands 30 pts 1MV
Reserve Infantry 6 stands 30 pts 1MV
Veteran Infantry 3 stands 51 pts 2MV
Artillery Battery 2 8 pdrs 24 pts 2MV
Res Arty Battery 2 8 pdrs 39 pts 2MV + Full Caissons, Expert Gunner
Total 174 pts 8MV
Dragoon Brigade (in centre)
Dragoons 5 stands 70 pts 2MV + Le Beau Sabre
Dragoons 5 stands 70 pts 2MV + Le Beau Sabre
Dragoons 4 stands 52 pts 2MV
Artillery Battery 2 4 pdrs 14 pts 2MV
Total 206 pts 8MV
Light Cavalry Brigade (reserve, in centre on turn 1)
Hussars 5 stands 75 pts 2MV scout
Chasseurs 3 stands 33 pts 2MV
Artillery battery 2 4 pdrs 14 pts 2MV
Total 122 pts 6MV
Grand Total: 801 pts, 30MV, 1 Scout (max)
My plan was to fight a defensive battle, dig-in one of the infantry brigades behind fieldworks and invite the French to attack it, or the other brigade, then use the light cavalry to support them and the grenadiers to come in and hold the line behind them, counter-attacking if required. This of course was based on the assumption that the French would baulk at attacking the fieldworks. I didn’t want to be entirely static, I would punch-out to counter the French, use the light cavalry aggressively, but not just to ride off and get destroyed (losing the entire brigade would be easily done and cost me the game). So, how did it go?
Err, not that well. First off, I failed to get any fieldworks built, which was a blow, still, the defence could still work, same plan, just no defences. I really should have included a sapper detachment for the digging-in brigade, but it’s something I need to add to my Austrians. Note to self, buy some Austrian sappers and paint them!
The French planned an infantry assault, on their right with their strong brigade, reserves out front in line, to take the punishment, with the line infantry following in columns behind that screen to rush through the make the final assault. It would be supported by the guns of his weaker infantry brigade (their job was to shoot a lot and the infantry was just to protect those batteries from the enemy, like roving light cavalry. He also had his dragoon brigade, a powerful asset and it would move up and try to co-ordinate its attack with the infantry, so if the Austrians formed square, then his infantry could blast them into bloody ruins. Behind, his own light cavalry had it’s own mission, the hussars were insurance, to get a fourth cavalry charge (looking to complete the ‘grand assault’ objective) with the chasseurs only being used for driving-in Austrian skirmishers (those pesky jaegers).
We both deployed, French with flanks forwards (both infantry) and the dragoons in the centre, being further back wasn’t a issue for them, one ‘at the quick’ move would catch-up. The Austrians had a screen, the light cavalry in front of the left flank. The right (French left) was something of an issue, as in randomly generating the terrain I had rolled up a large, dense wood, which was an big obstacle. I couldn’t leave it undefended, otherwise his light cavalry could gallop round and either flank me or quickly complete the ‘advance through enemy lines’ objective. Still, it was clear to both commanders no major attack would come that way, so the fight would in the centre and on the Austrian left.
Added to this issue, pre-game everything was working like a well-oiled machine for the French, whilst I had 1 command point, they rolled 3, for a total of 5!. His reserves would also arrive on Turn 1, mine on Turn 3 (quick for infantry though). The French won the tactical advantage and so chose table edges and I deployed first, so hey, it couldn’t go much better for Bony’s men before shot was fired in anger.
So, Turn 1 and the French began their attack against my left, infantry lines, columns behind moving up slowly, and taking fire from the deployed jaegers and the artillery. The Austrian centred moved up across the cornfield and formed firing lines here, awaiting the cavalry and prepared to jump into square if/when the dragoons got too close. On my left the infantry line also moved up, as the light cavalry pulled back through their lines (1 disruption all round) but they were in place to charge back through (just taking that disruption) and punch out if his infantry approached. At the end of the first turn, a bit of damage done, but nothing dramatic, mainly we were finding artillery lines of sight and ranges were poor, so not much doing from the gunners yet. In the end phase, continuing the French run of good rolling, their light cavalry arrived in the centre in columns of march to advance in support of the infantry attack.
As predicted, nothing was happening on my right, so back to the French attack. The cavalry first moved up, but a ‘stalled’ dragoon regiment stopped the entire brigade, willing to wait to move together. The light cavalry were soon behind the infantry and deploying into line. The chasseurs sent out a harassing squadron and drove in my jaeger skirmishers. The lines were then close enough to exchange volleys, both sides raking the other and the French flinched first, after 2 volleys the reserves withdrew back out of range and rallied off the damage, costing a few bases. As they did, the Swiss battalion-column behind burst through and charged my forward horse battery, overrunning it. They then paid the price for such boldness, counter charged by my waiting hussars and an infantry battalion, beaten twice, then shot-up, the Swiss fell back, rallied and removed all but 1 stands to remain in the fight (well, not really, just still there). Carnage, and a big pile of Swiss dead. The Austrian line was holding well, as the hussars came back to position again, but only after being bombardment by artillery and taking more damage, they needed to rally too and lost a stand. On their left the French limbered up a battery and moved it off, heading up the small hillock, which I could nothing about. If the French got the ‘guns on high ground’ battlefield objective then it was easy VPs. The random terrain generator had favoured the French here. A bit more skirmish fire saw out the turn.
The third turn would see more skirmish fighting and rallying on the Austrian left, and the dragoons moved up, but with one regiment under accurate artillery fire and in disorder they had to stop again and rally-off the disruption. They were finding it hard to just get forwards. With more cannon fire into the French infantry they too could not press their attack either and so it was stalemate for a turn, fine by me on the defensive. We were holding them off, and the VPs were pretty even, slight advantage to the French. In the end phase, my grenadiers marched in to reinforce the centre, expecting that looming cavalry attack soon. If the infantry broke, which seemed unlikely in square (which I had to get into this turn), then the grenadiers would be their to hold the line and their volleys into the dragons would hurt. Speaking of which, I had (just) completed the ‘hold the line’ objective. All VPs help (and I rolled a 1 of course - eye-roll!).
Turn 4 would be decisive, and not in a good way. The French launched their grand assault attempted, with a lethal combination of special events and orders. First, the dragoons used a ‘at the gallop’ to race up and, with a second play, immediately charged my infantry lines. Oh no, my next play was to form square, nooo! Too late now! 2 dragoons regiments ploughed in and smashed up the lines, both falling back in disarray and with a lot of disruption. It got worse. I had to rally, but the dragoons followed up and charged again, in a repeat and saw both infantry regiments ridden down. The third dragoon regiment had also raced up (using at the quick) and they moved through and attacked my reserve landwehr, also caught not in square and torn apart too. A mess. My centre had been cut to ribbons under dragoon sabres. As I rallied again to try and save something, the French hussars joined the heavy cavalry and charged, to be counter-charged by my lancers which rode through the infantry line ahead to meet them, and defeat the French, sending the hussars riding back where they had come from and needing to rally, but so many cards had already been used, they couldn’t and were routed… but their charge had completed the fourth unit needed for the ‘grand assault’. The French also, by fortune, held the ‘guns on high ground’ objective… and could claim it. Drat!
Well, that turned into a disaster, the Austrian centre had been smashed open by the dragoons and the French VP total raced up to 40! The Austrians had just 14, so not even half the French total. A decisive victory for France, and 20+ VPs in a turn. The Dragoons were in a bit of mess, but no units had broken, only losing the hussars (in a continuation of our theme that hussars rarely seem to do very well). Bony will be pleased with that report.
The lesson here, wait too long to form square at your peril, because the special events can throw out all your planning… still, it was a fun 3 hours of gaming, even if it ended in a kicking. I cannot stop the French dragoons… maybe I just need my own to counter them, add a new Austrian dragoon regiment to the shopping list (it's growing).
 |
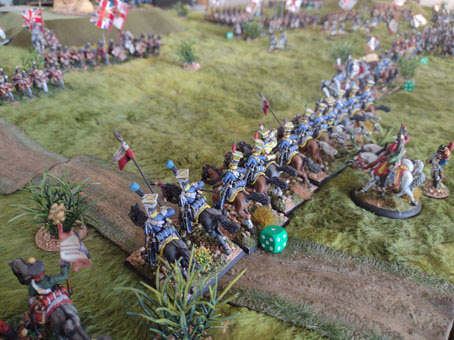
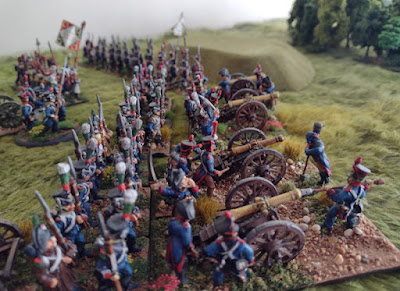
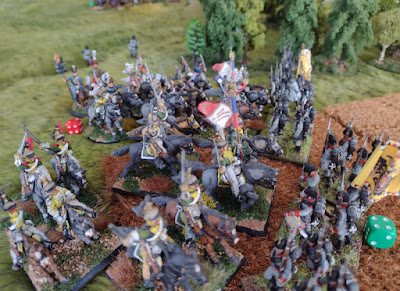
Austrian left and light cavalry screen.
|
 |
The centre in the cornfield.
|
 |
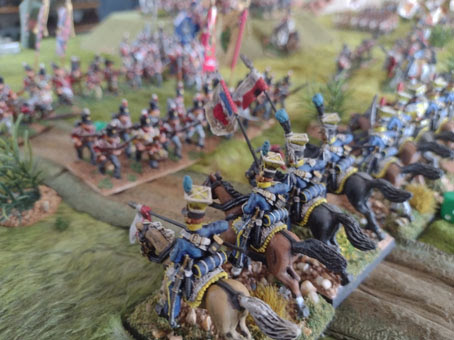
Hussars and uhlan, the counter-attack force.
|
 |
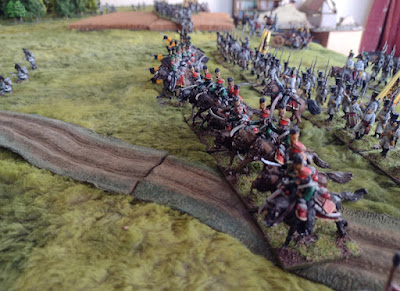
Sound the pas de charge! The attack columns.
|
 |
French gunners, found with few targets or out of range. Note the hillock behind, handy for high ground, screened off by the large, dense woods.
|
 |
Austrian guns, the forward horse battery was lost, but the foot battery 6 pdrs did good work on the flank.
|
 |
Smoke, as the game started in morning mist (it soon lifted). Austrain counter-attacking column waits to go in against the reserves.
|
 |
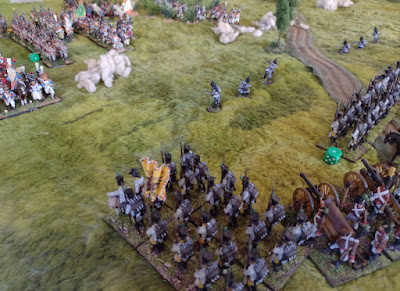
French cavalry in the centre, deploying their 4 pdr battery.
|
 |
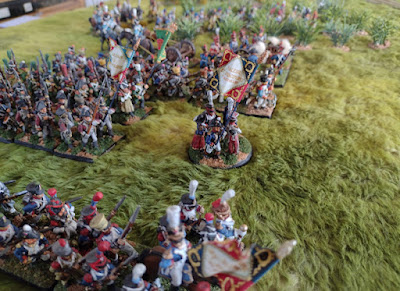
Grenadiers arrive in the centre, but block the 12 pdrs line of sight.
|
 |
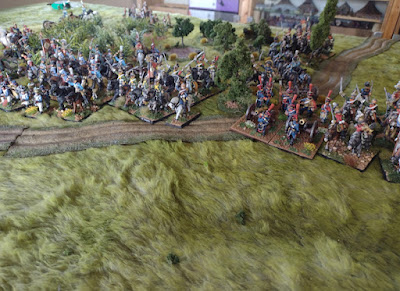
Uhlan meet French hussars and drive them off, but behind, the dragoons are tearing through the cornfield.
|
 |
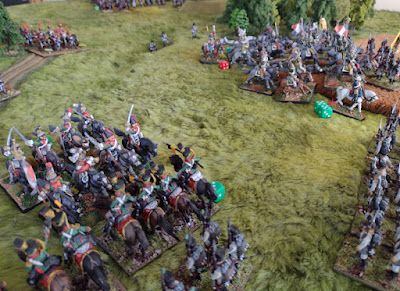
Charge! and Charge! again, the dragoons catch the Austrians in line and destroy them. Here, the poor landwehr are hit.
|
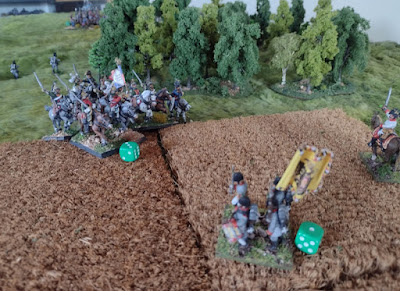 |
All that is left in the cornfield, 1 stand of the landwehr and the 'at risk' command stand. Two battalions shattered and gone.
|